In 2024, anyone, even without having specific knowledge of development and IT, can create and put a website online.
Whether you want to create a personal website (blog, portfolio, etc.) or for a business, the only thing you are going to need to succeed are the right tools. Through our tutorial, we will explain to you how to deploy a website on WordPress from A to Z. And this without having to call on web agencies, a freelancer, etc.
To complete this mission, you will just need to devote a few hours of your time to it.
Things you need to build a site
To begin, and as with any good recipe, we will remind you of the ingredients you will need to create your website.
There are three of them:
- Web hosting (the service that will allow you to host and put your website online –we recommend Hostinger).
- A domain name (this is the address of your site that everyone can use to access it:iphon.frin our case).
- The WordPress content management system (it is completely free and is the most used CMS on the Internet in 2024).
As you will be able to see in the rest of our tutorial, once you have registered your domain name and have web hosting, you can start installing, configuring, then putting your WordPress site online.
This process is made increasingly easier thanks to tools that will assist you, step by step.
Do you feel ready to start creating your website? Here we go!
1) Choose a domain name
Before even thinking about putting your website online, you will need to find a domain name worthy of the name.
And this is a step that should not be missed as it is so important! Your domain name will be used by your visitors to refer to your site. Above all, it will be used to access this one.
The chosen name must therefore be easy to write, meaningful, and if possible easy to remember. For your information, the price of a domain name will vary greatly depending on the extension chosen (.com, .net, .fr, etc.).Generally, you will be able to get by for €8 to €20 per year..
Do you already have a domain name in your possession? In this case, we will see you in step 2 of our tutorial. If, on the other hand, you don't yet have one, here are some additional tips to finalize your choice of domain name:
- If you want to set up a business or professional website, your domain name must correspond to your brand.
- The domain extension will be defined by the visitors you want to reach: if you hope to reach international visitors, choose a .com or .net. If, on the other hand, you want to settle for a French audience, the .fr will do the trick.
For a personal blog, it may be interesting to use your first and/or last name. Now you will need to check that it is available. To do this, do not hesitate to use the domain name availability check tool offered by Hostinger:
Check the availability of your domain name
Once you have confirmation that your domain name is indeed available, don't go any further! We will explain to you in step 2 how to register it for free.
2) Subscribe to web hosting and register your domain name
Choosing a web hostis the central part of your site creation project (whether on WordPress, Joomla, or another CMS).
Web hosting is in fact the service that will power your site and store the data related to it. Without it, your site will not be accessible to everyone on the Internet.
Generally,good web hosting will cost you between €2 and €10 per month. This price range seems to us to be the most reasonable, especially if you are just starting out. As you might expect, it is also possible to pay much more for your web hosting.
Next, we will recommend a host that we particularly like, especially for creating a WordPress site. Now know that regardless of your choice of host, it will be important to find the following features:
- Automated WordPress installer
- Unlimited bandwidth
- Free domain name and SSL certificates
- Customer support available 24 hours a day, 7 days a week
- Satisfied or refunded guarantee (to cover your back in case of unpleasant surprises)
That being said, we will explain to you how to subscribe to a web hosting offer, andhow to get a free domain name.
We recommend using Hostinger to carry out this mission. In fact, he suggeststhe best WordPress web hosting of 2024. Do not hesitate to read our comparison on the subject to obtain more information on this subject.
Hostinger will offer you a free domain name for 1 year and above all, inexpensive web hosting. Its WordPress hosting is available from €2.99/month.
Better yet, by using our exclusive promotional code, you can get an extra 10% off.
Click on the button above or the image that follows to go to the Hostinger website:
© Hostinger
Then click on the button “To start” in order to select the plan that best meets your needs:
© Hostinger
Add the WordPress hosting of your choice to the cart. You will be redirected to your basket. First of all, think aboutapply our promo code “IPHON” to obtain -10% reduction.
Once this is done, check the availability of your domain name again, and proceed with the registration:
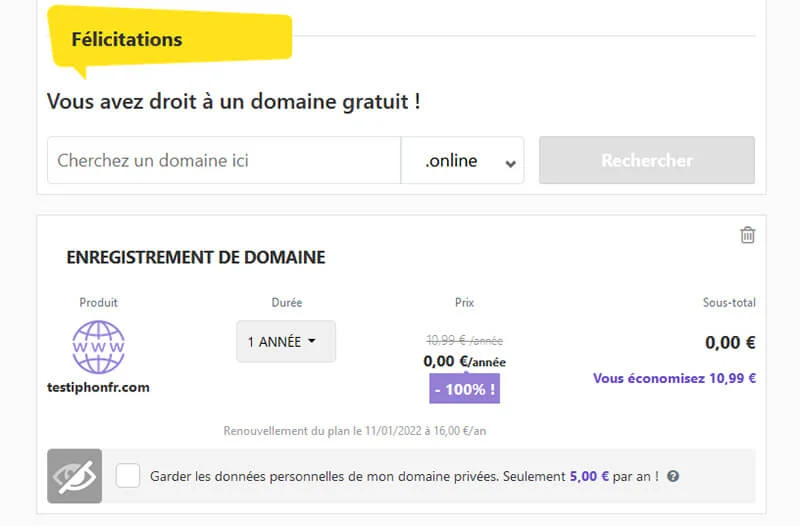
Free domain name registration © iPhon
Click the button “Pay now” available on the right of your screen to proceed with payment. Hostinger will ask you to create an account (or log into your account if you already have one). Enter the email, username and password that suit you and then confirm everything.

Creating your admin account on Hostinger © iPhon
Following this, you will be able to pay for your web hosting for WordPress. Once payment has been made, you will finally be able to access the administration panel of your WordPress hosting by connecting to your previously created account.
This is where the serious things will begin regarding the creation of your website.
3) Install WordPress on your web hosting
Now that you have your web hosting and your domain name, you will need to choose and install the CMS (content management system) of your choice.
To create your site quickly and easily,we recommend using WordPressbecause you will have access to a lot of documentation,quality free themes, as well as quite a few interesting plugins.
That said, you can very well opt for Joomla, Drupal, etc. The choice is yours after all, it's your site!
The advantage with Hostinger is that it offers an automated installer for WordPress. Once connected to your customer area, you will be able to access it:
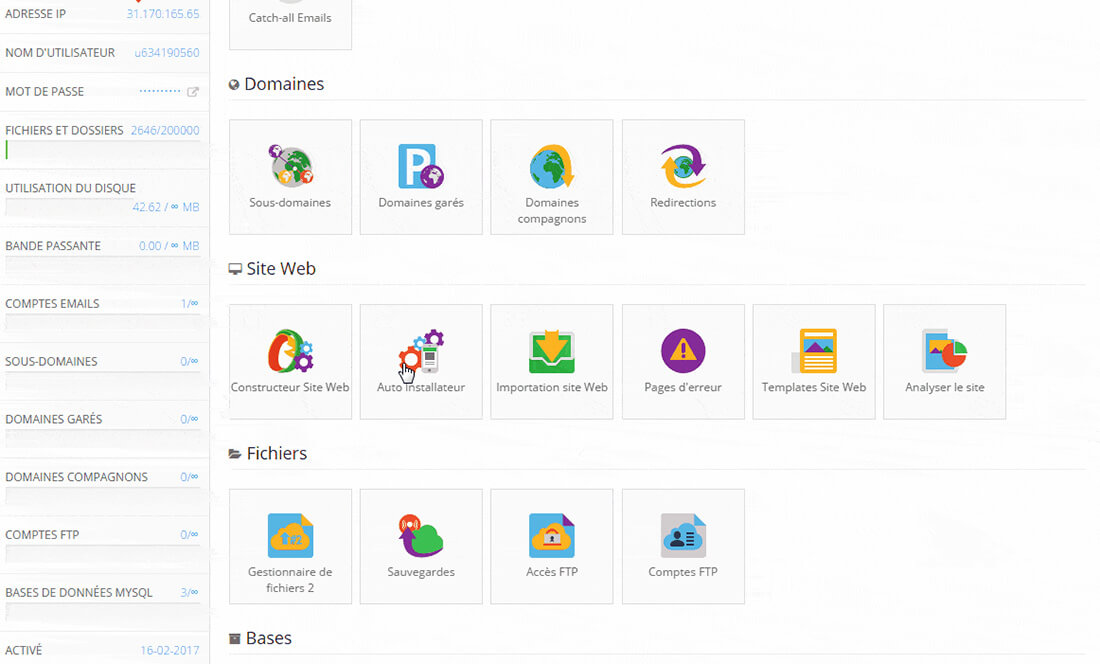
© iPhone
As you can see in the image above, you will need to click on the logo “Car Installer” then search “WordPress“. After that, you will be redirected to the following configuration page:
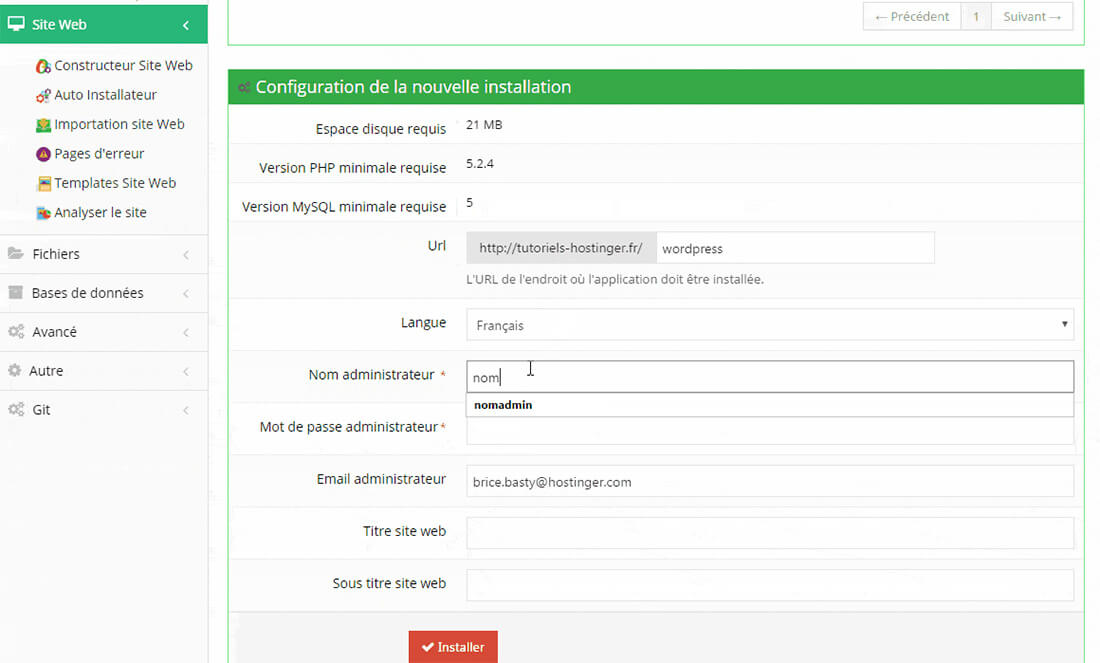
© iPhone
Everything will happen very quickly here. You will only have to enter the location where to install WordPress, the language of your site, your administrator name and password (which you will use to access the WordPress administration panel of your site), an email, the name of your site, as well as a subtitle (a catchphrase).
As soon as everything is completed, click on “Installer“.
The whole thing will take you 5 minutes maximum. After that, your website will be officially created and live! We weren't lying to you when we told you that the process is extremely simple. Especially if you have opted for Hostinger.
4) Start customizing your site
Are you still with us? Take a few moments to recover from your emotions because you have just created your website on WordPress. You will now have to personalize it so that it corresponds to the image you want to give it.
To do this, the first thing you will need to do is log in to your WordPress administration area. Go to the following address: nameofyoursite.xx/wp-admin/.It's the /wp-admin/ that is important here.
By adding it to your site URL, it will take you straight to the WordPress admin panel:

© iPhone
Enter your username and password (those defined in the Hostinger automated installer). You will then see the administration area of your site appear:

© iPhone
Now we will start customizing your newly created site by changing the theme used.
Choose and install a theme
To choose and install a new theme on your WordPress site, you will have to go to the “ tabAppearance" Then "Themes“. Then click on the button “Add new” (available at the top of the page).
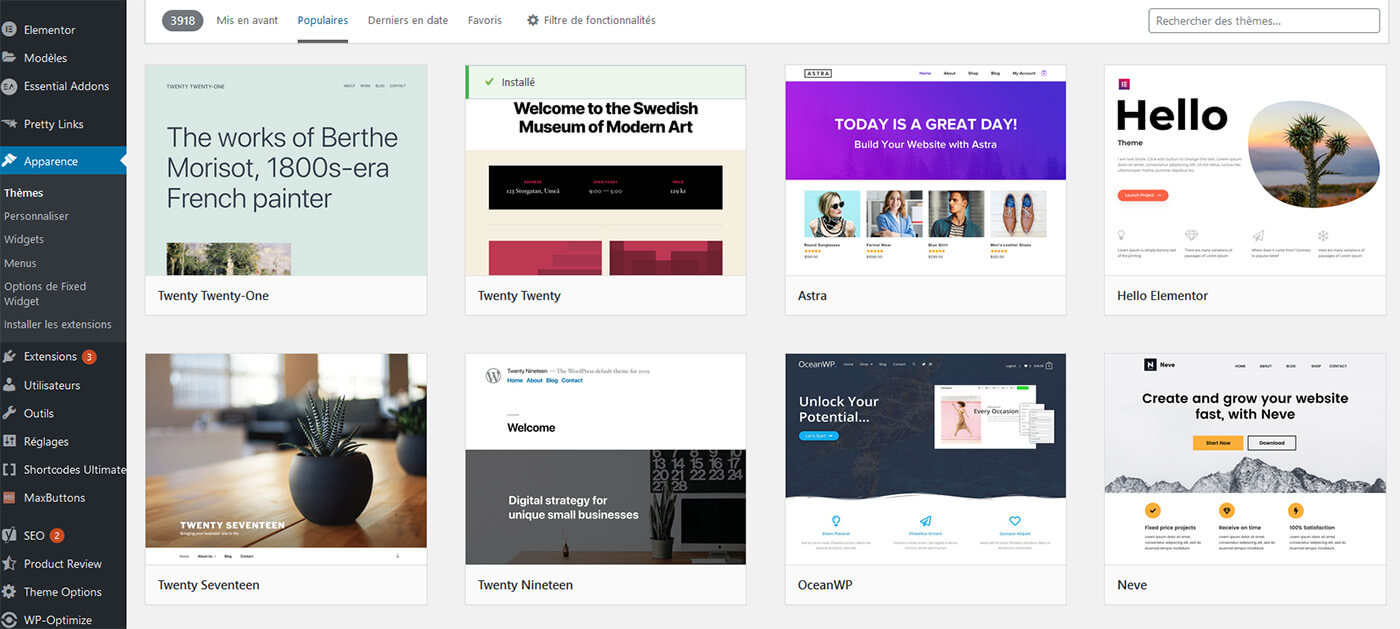
© iPhone
Once you arrive at your destination, you will be able to find the most popular themes, the latest ones, or even those highlighted. If you already know which theme you want to use, you can even do a search by typing its name.
Before installing and using a theme on your site, consider using the preview tool. This will give you the opportunity to have a preview of the actual rendering.
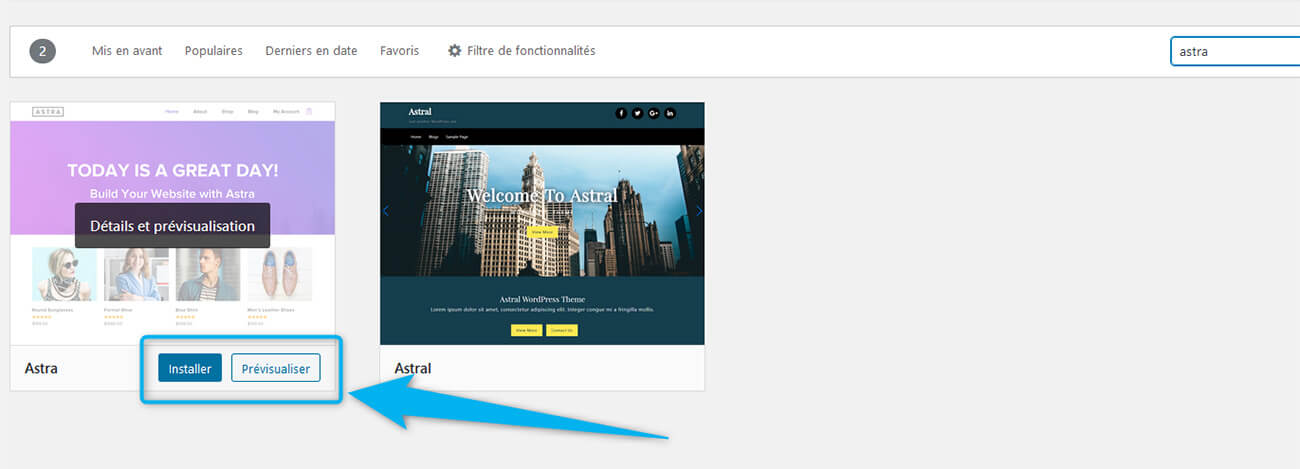
© iPhone
Once you have made your choice, click on the button “Installer" Then "Enable“. And there you have it, you have just changed the theme of your WordPress site.
Customize theme colors
You will now have to personalize everything because your basic theme will be rather basic. To do this, you must go to the menu “Appearance” et “Personalize“.
Following this, you will find a certain number of parameters for your theme that can be modified.
To modify the colors used by our theme, we had to go to “Theme Options" Then "Colors and appearance“. This may vary from theme to theme. So don't hesitate to browse the different submenus to find these options.
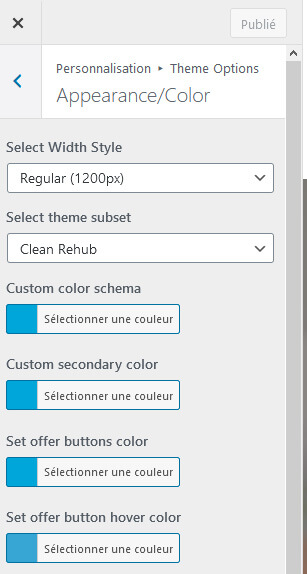
© iPhone
From there, you will have the possibility to modify absolutely all the colors linked to your theme: button, text, hyperlink, background, etc.
Add a logo and favicon
After creating a website, it is important to add a logo and especially a favicon (this is the small logo that will appear in the tab of your web browser where your site is contained).
To add a logo and favicon, simply go to “Site identity” :
![]()
© iPhone
WordPress will give you the ability to upload your logo to your site's image library, then select it. The process for the favicon will be exactly the same!
Note however that for your website's favicon,your image must be square in shape. Additionally, WordPress recommends thatthe dimensions are at least 512 x 512 pixels.
Add widgets to the sidebar
The visual appearance of your site has already evolved significantly if you have followed our recommendations.
We will now explain how to add elements to the sidebar (the bar that will be visible on one side of your site). Provided of course, that you want to use one.
If the answer is yes, you will need to go from your WordPress admin panel to the “ tabAppearance" Then "Widgets” :
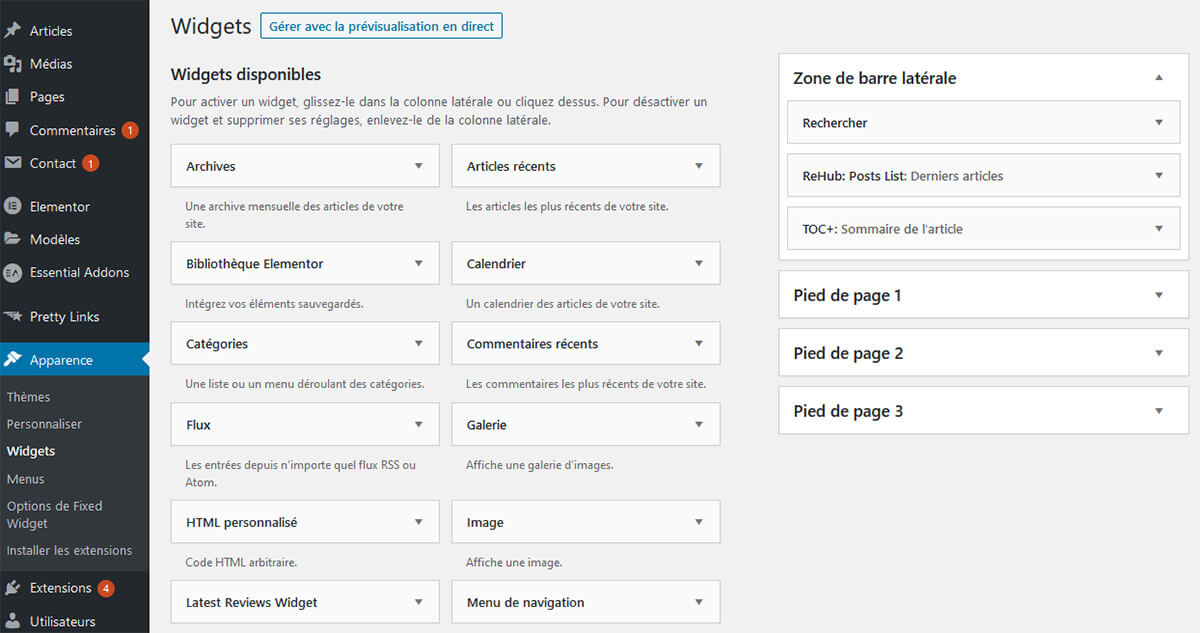
© iPhone
From this interface, you will be able to add or remove widgets from your sidebar.
For information, the widgets offered are diverse and varied:
- Search function
- List of latest published articles
- Text block (to add custom content)
- Image
- Video
- …
If we may offer one piece of advice: don’t overcrowd the sidebar of your site. Try, if possible, to limit yourself to 2-3 different widgets.
Once you've customized everything, you won't need to save anything. This is done automatically. You can therefore leave the page in question and continue to administer your site.
5) Create and write articles/pages for your site
Creating a website on WordPress is great! But having content on it is even better. Don't you think so?
It is time for you to get down to writing the articles and pages of your site.
To write an article, you will need to go to “Articles" Then "Add“. For a page, it will happen in “Pages" Then "Add“.
In terms of the interface for editing an article or a page, everything will be practically the same. There is no big noticeable difference except that you will be able to assign categories and labels to your articles (something impossible on a page).
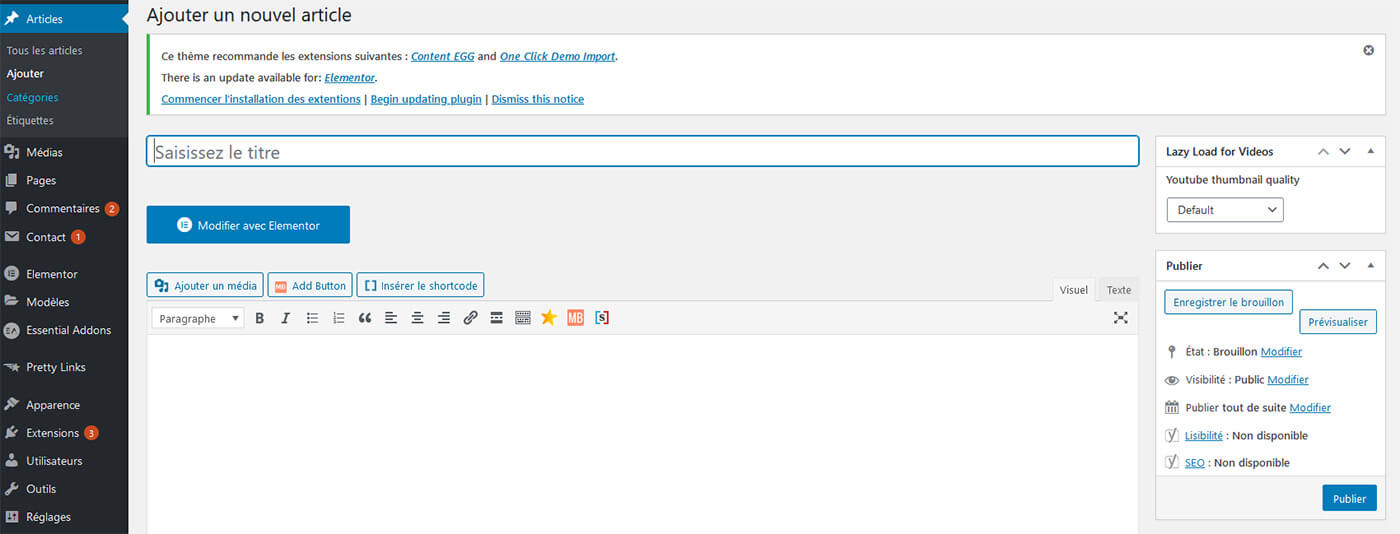
© iPhone
We advise you to create pages on your site relating to the following subjects:
- Home page
- Presentation of your person / your company (about)
- Contact page (so visitors can communicate with you easily)
- Privacy policy / cookie management
For everything else, use the articles. This is even more true if the site you have just created is intended to becomeun blog WordPress.
6) Set up a navigation menu
After creating your first articles and pages, you will have the opportunity to create and organize your site's menu.
How to do it? Go (again) to “Appearance" Then "Menus” :

© iPhone
Once you are in menu management, you will be able to create a new menu, name it, and add elements to it.
On the left, you will find the latest published articles and pages. Better yet, you can do a search if you already have a large number of articles.
Via a click/drag function, you will be able to create menus, as well as submenus. Once you can organize everything the way you want, all you have to do is save your menu.
For the menu to be used by your WordPress website, remember to check the “Primary Menu” box in the menu settings (see the screenshot above).
7) Install and configure plugins to add functionality to your site
Our guide explaining how to create a website using WordPress is coming to an end.
However, we still want to suggest that you install plugins. Thanks to them, you will be able to benefit from additional functionalities on the side of your administration panel, but also offer them to your visitors.
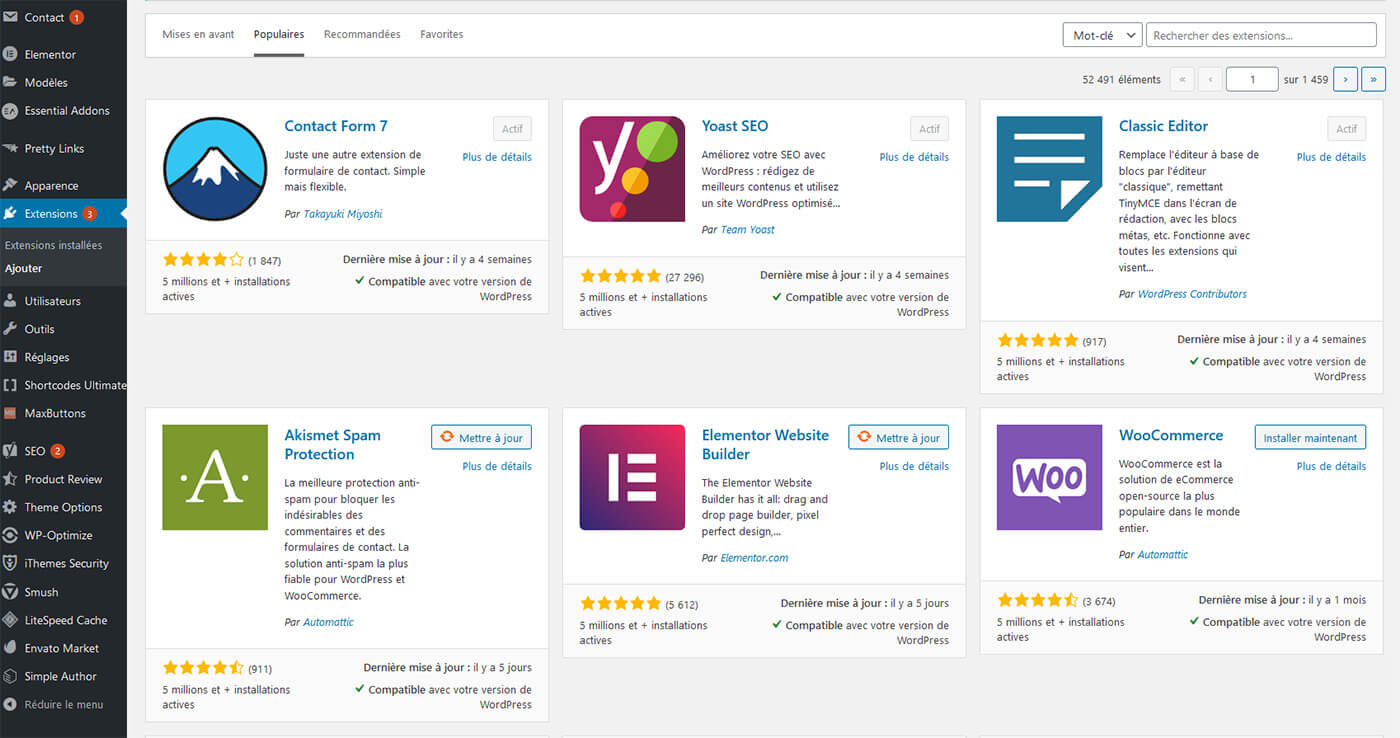
© iPhone
You will find all the plugins compatible with WordPress in the “ tabExtensions“. As with themes, it is possible to sort, do a search, or even find the most popular plugins.
All plugins available in the WordPress catalog are free. Now, in some cases, you will also find a more complete paid version. It's up to you to decide if it's worth it or not.
Which plugins should you install on your new WordPress site? Here are some ideas:
- Elementor :to 100% personalize your pages and your site
- Contact Form 7 :to create beautiful contact forms
- WooCommerce :if you want to create an online store via WordPress (don't hesitate toconsult our ranking of the best WooCommerce hosts)
- Rank Math :to optimize the SEO of your site
- LSCache (coupled with LiteSpeed):to manage and optimize your site's cache (the host Hostinger offers you the duo for free with its WordPress hosting)
We could list dozens of other plugins but that is clearly not the goal of this article on creating a website. In any case, you have some avenues to explore on your side.
For more information on this subject, take a look at ourranking of the best extensions to have on WordPress.
Conclusion
That’s where our guide on how to create a WordPress-based website ends.
We hope that through all the steps we have detailed, you have been able to create the site of your dreams: professional, fast, and easy to administer.
Please note, however, that your site is only just beginning. You will still have to give of yourself in order to improve it, bring it to life, and above all make it known.
If you also aim to monetize your website, you will also need to look into the issue by exploring the different solutions that exist.
Frequently asked questions related to creating a site
Is it possible to create a free website?
Yes it is possible but it is not something we recommend. Indeed, if your objective is to create a professional website, favoring a 100% free solution will quickly become blocking. Your platform will be slow, there will potentially be advertisements, and above all you will not have access to all the possible and imaginable features. This is why if you have a tight budget, we recommend that you opt for an inexpensive web host:Hostinger (available from €2.99 with a free domain name).
How much does a website cost?
Everything will depend on the web hosting you are going to subscribe to, and if you want to buy a paid theme, plugins, etc. In our opinion, it is not necessarily necessary to pay a lot of money to put a quality, professional-looking website online. By following our site creation tutorial step by step, you can get by for €25-30 per year. Afterwards, you will potentially have to add the purchase of a theme and plugins (it is however possible to get away with free options).
What is the best web host for your website?
Having tested a number of web hosts and hosting providers, we can assure you that the best solution in 2024 for creating a site isHostinger. It is inexpensive, efficient, stable, and has responsive customer support. You can't go wrong with this European host! If you absolutely want a host with a data center in France, then we advise you to opt forPlanetHoster et son plan The World.
How to create a professional website?
By following our tutorial for creating a site, quite simply! You will have a professional and efficient site. Above all, you will have the possibility to upgrade your hosting if your site ever grows quickly. So you will never be taken by surprise.
How to create an online store from a WordPress site?
After following all the steps listed in our guide explaining how to create a website, all you need to do is install the plugin called “WooCommerce”. The latter will transform your WordPress site into a real online store. The big advantage of this solution is that it is easy to use and what's more, no fees will be taken from the sales made (unlike Shopify, for example).
How long does it take to create a site?
Creating a website and putting it online is a process that can take you just a few minutes. Now in this scenario, your site will be rough. You will still have to spend a lot of time personalizing everything and, above all, writing pages and articles.
The time required to create a site will also depend on the tool you decide to use. With a CMS like WordPress it may actually take more time than with a site creator likeWix. Now one thing is certain: once your site is created, everything will be far from finished. It will be necessary to bring it to life and make it known.
Who are the best site builders?
After spending several monthsto test the main site creators on the market, we are of the opinion thatWix is the reference in 2024. It has the advantage of offering a complete and easy-to-use tool. Above all, you will be able to start for free… and therefore without taking the slightest risk.
That being said, we quickly advise you to switch to a paid plan in order to be able to connect your own domain name to your site and remove Wix ads (which are imposed by the platform for its free users).
What is the difference between UX and UI?
First of all, it is good for you to know that the terms UX and UI are closely related. Now it's not quite the same thing. The UI is the user interface (User Interface in English, hence the term UI). This refers to the environment offered to the user of a website or application. This includes the design, structures and even functions that help users find their way around.
UX refers to user experience. It refers to a person's perceptions and responses that result from the use or anticipation of the use of a product, service or system.