How do you go about creating and putting a WordPress-based blog online? This is a question that many people ask themselves because WordPress isthe most used CMS in the world of blogging. To help you in your process, we have decided to produce a tutorial explaining you step by step how to proceed.
After explaining how to create a WordPress blog, we'll answer some questions related to blogging, web hosting, and more.
How to create a WordPress blog? (Full Summary)
Before detailing each of the steps that you will have to carry out on your side, we thought it would be good to provide a short summary. Here are the steps to follow to create and upload a new WordPress blog:
- Choose a domain name
- Get web hosting and register your domain name (We advise you to use Hostinger, the domain name is FREE)
- Install WordPress on your web hosting
- Select and install a WordPress theme that matches the theme of your blog
- Install plugins
- Write content for your blog
In just six steps, you will achieve your goals. Obviously, the road will still be long afterwards since you will have to keep your blog alive. In any case, be reassured now (if you had any apprehension), because the process of creating a WordPress blog is not very complicated.
Plus, the whole thing won't take you several hours. And this even if you are a novice!
1) Choose a domain name
The first thing to do before even considering putting your WordPress-based blog online is to choose a domain name.
The domain name of your site is a bit like your brand image. This is the name by which your visitors will refer to your site. It should therefore not be neglected.
First of all you will have to choose an extension (.com, .fr, .net…). If your blog is aimed at an audience located in France, then .fr seems to us to be the most judicious choice. On the other hand, if you want to reach an international audience based all over the world, then it will be better to opt for a .com extension.
Concerning the domain name itself, try not to make it too long or too hard to pronounce. Above all, it must be in the theme that you wish to cover. If it is easy to remember and pronounce, visitors will have no trouble remembering it, or talking about it to their loved ones...
Once you have found the domain name that corresponds to your blog and its theme, you will be able to think about starting the creation process.
2) Subscribe to WordPress hosting and register your domain name
To create your blog, you will have to put it online and host it somewhere. To do this, you need to look for web hosting worthy of the name.
To make your task easier, and above all not to break the bank, we have selected for you aWordPress hostthat stands out from the competition: Hostinger.
With it, you will be entitled to excellent performance, maximum stability, as well as advanced features. For example, you can benefit from a free domain name, free SSL certificates, or even a cache management plugin (LSCache) that you can couple with LiteSpeed Server technology.
Thanks to this combination, you will be able to best optimize the speed of your WordPress blog. For more information on the subject, consider consulting ourtest complet d’Hostinger.
Discover Hostinger’s accommodation
How much will this cost you? Everything will depend on the formula you choose:
- Premium : €2.99 per month
- Business : €4.49 per month
- Cloud Startup : €9.99 per month.
To see the differences between each plan, do not hesitate to click on the image below, or on the button available a little higher.
You will find a comparison of the functionalities as well as the technical characteristics offered via each of the offers.
© Hostinger
No matter your final choice, know that you can get an additional 10% off using our Hostinger promotional code:count. All you will have to do is fill it in before finalizing your order (see our tutorial explaininghow to apply Hostinger coupon).
Before finalizing your order, you should also think aboutregister your domain name(and see if it is indeed available):
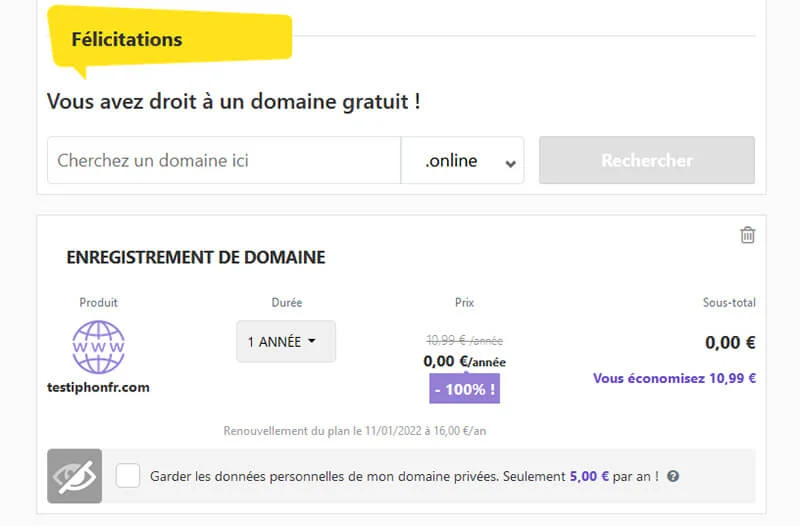
© iPhone
Once you have confirmation that the domain name you want for your WordPress blog is available, all you have to do is pay. To do this, you will need to create an account with Hostinger (account from which you will log in to access the administration panel).
Discover Hostinger’s accommodation
3) Installer WordPress
Now that you have web hosting worthy of the name, you can start installing and configuring your WordPress site.
If you have opted for Hostinger, you will have access to an automated installer. The latter will allow you, in just a few steps, to configure and put your WordPress blog online.
And this without even having the slightest knowledge.
To get there, you will need to access your administration panel by connecting to your Hostinger account.
As shown in the screenshot below, you will then need to find the Auto Installer. Once done, click on the corresponding logo:
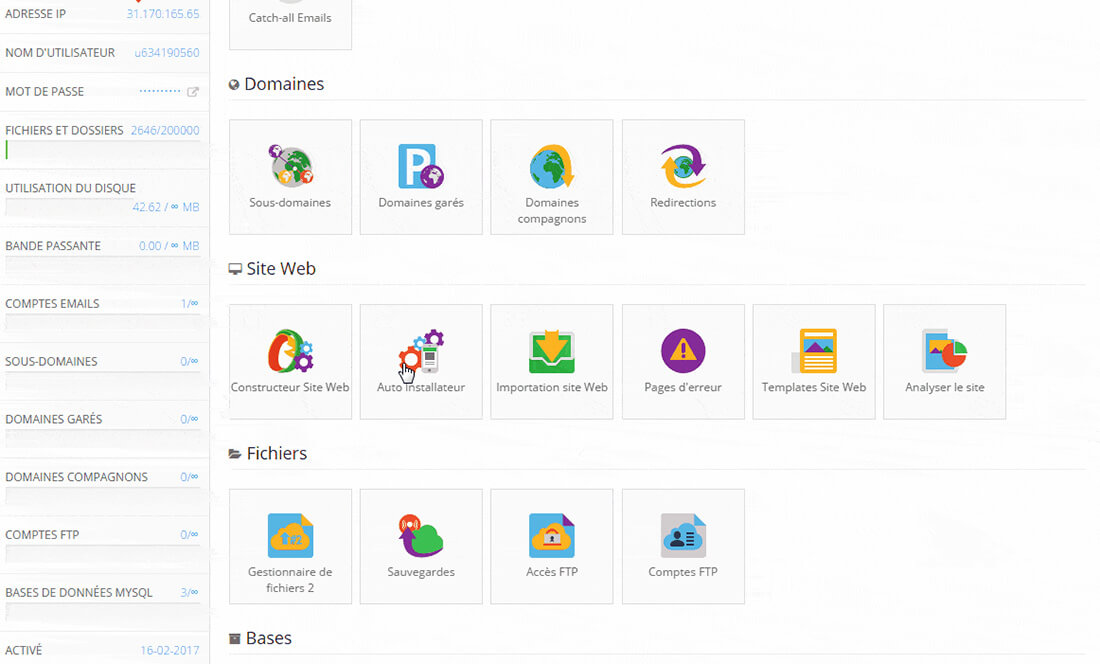
© iPhone
Once you have clicked on the Auto Installer, you will need to do a search for WordPress.
You will then see the latest version of the CMS appear. Click on it again to start the process of setting up and installing your blog:
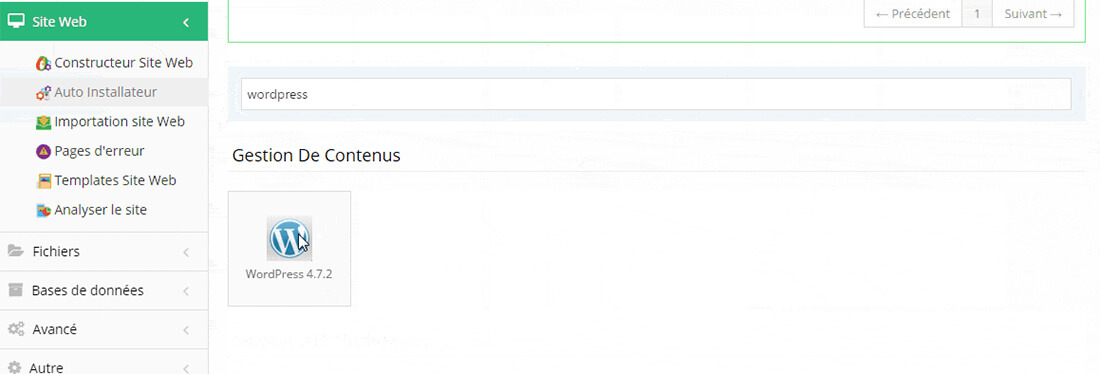
© iPhone
As you can see in the following screenshot, you will have some information to enter such as: the language of your site, your administrator name, the password (they will be used to connect to the interface WordPress administration), an email, a title and a subtitle for your blog.
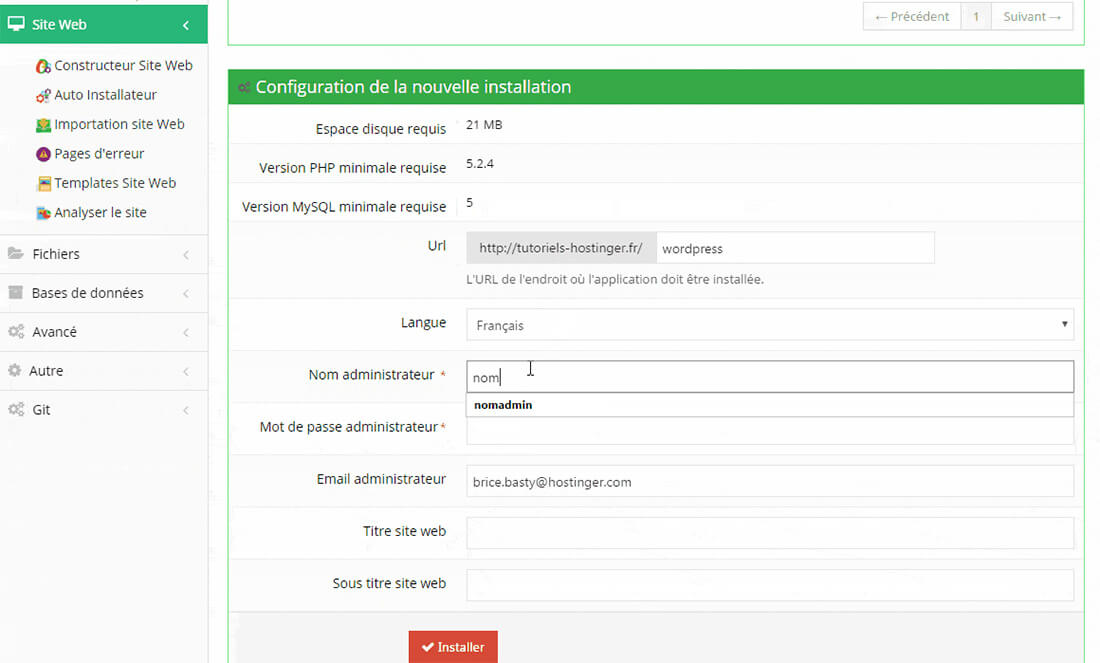
Configuring the blog on your WordPress hosting © iPhon
Once everything is completed, simply click on the “Install” button. Then wait a few moments and your WordPress blog will be online!
However, our tutorial does not end there. You will now have to carry out a certain number of adjustments and customization directly from your WordPress administration interface.
4) Choose and install a theme on your WordPress blog
To access the CMS administration interface, you will need to enter the following address in your address bar:https://nomdevotresite.xxx/wp-admin.
Press the enter key on your keyboard. You will then have the possibility to connect (with the identifiers defined in the previous step of our tutorial to install and create a WordPress blog).
Once connected, in the left menu you will find the tab “Appearance“. Click on it, then “Add a theme” :
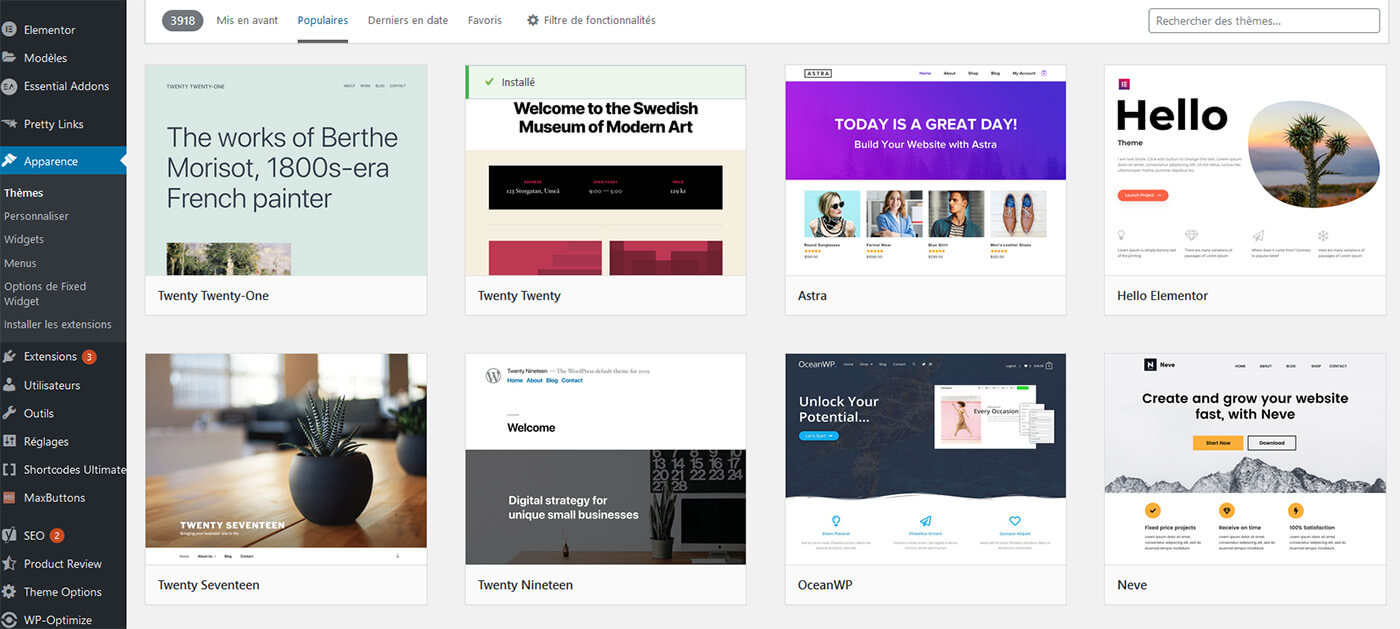
List of free themes available and compatible with WordPress © iPhon
This is where you can view all of thefree themes compatible with WordPress. You will even be able to preview them to better see what your blog will look like.
Once you have found the WordPress theme that suits your blog and its theme, proceed with the installation by clicking on the corresponding button.
After that, your blog will already look a little more like you. However, you will be able to push the customization much further.
To do this, in the tab “Appearance“, go to the part “Personalize“. You will see a large number of customization options available to you.
5) Customize your blog and add features using plugins
Your WordPress blog is created, the theme is installed. What to do now? Install plugins!
Plugins (or extensions) will give you the possibility of adding functionalities to your blog. Whether for you (on the administration side) or for your visitors.
To see which plugins may be the most interesting, do not hesitate to use the “Popular”, “Recommended” categories in the section.
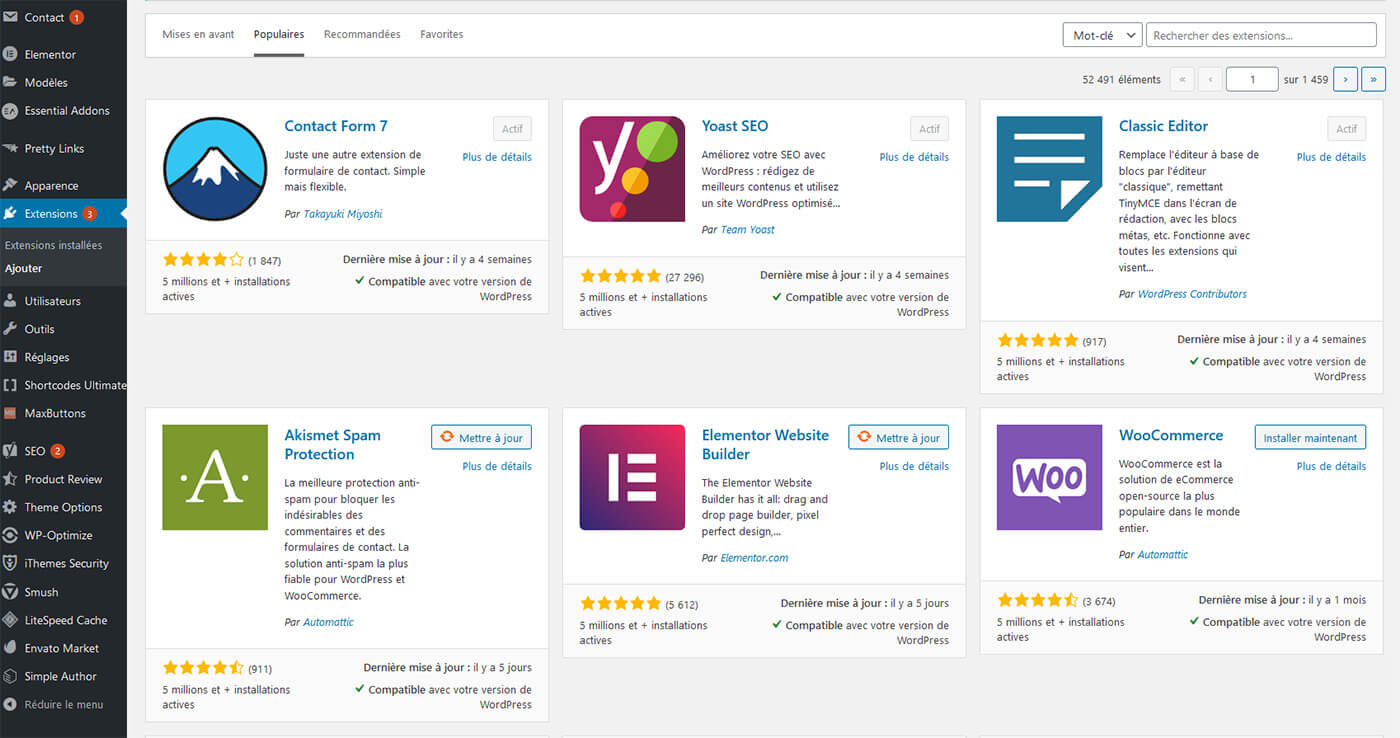
The plugins offered on the WordPress “store” © iPhon
To help you a little, here are some plugins that you will need to think about equipping your WordPress blog with:
- Rank Math (to manage SEO)
- Contact Form 7 (to create beautiful contact forms)
- Classic Editor (to have a clearer interface for adding articles/pages)
- Elementor (to personalize your blog and the visual appearance of your pages)
- LSCache (to manage your site's cache and optimize its speed)
- …
6) Add content to the blog (articles/pages)
Your WordPress blog is starting to take shape and look like you. So it’s time to start writing the first articles and pages of this one.
If we may offer some advice, don't jump in head first. Take the time to carefully analyze what you want to do, to structure your articles properly, etc.
Once everything is clear to you, go to the “Posts” or “Pages” section of your WordPress blog. Then click “Add”. You will then be redirected to this interface:
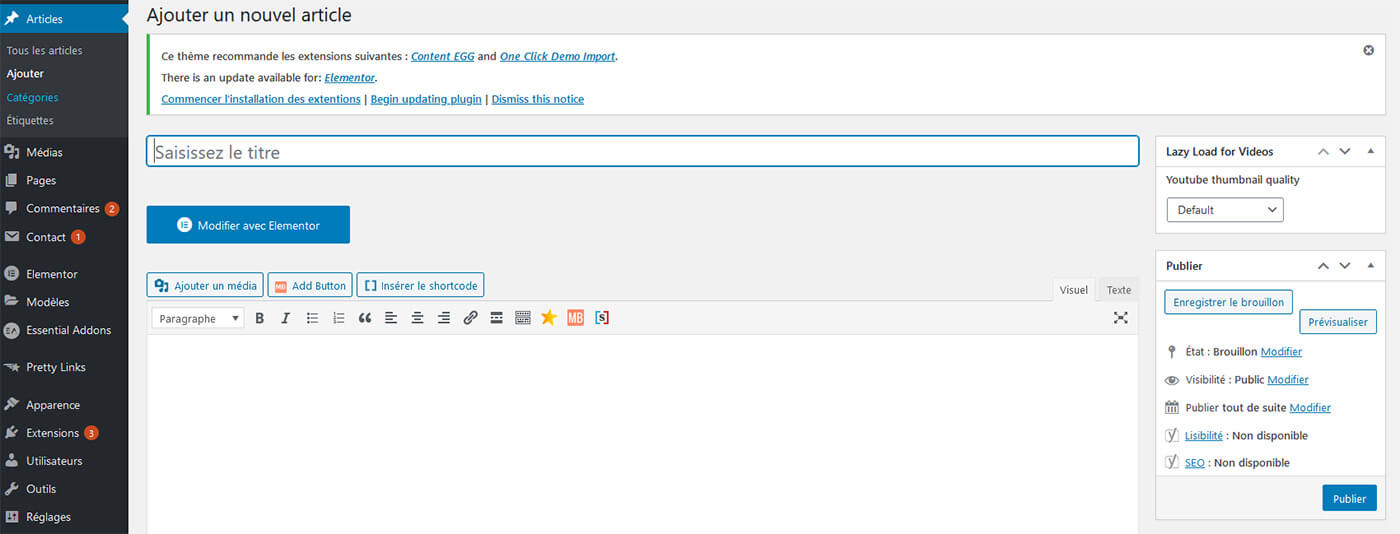
Interface for writing an article on WordPress © iPhon
Enter the title of your article, then write the content. Before publishing the article on your blog, obviously remember to reread it once or twice to eliminate small errors or omissions.
In addition, if you have installed an SEO plugin like Rank Math, remember to fill in the various necessary fields. This includes the SEO title of your article (the one that will appear in search engines), the slug (the structure of the URL of your article), as well as the meta-description (the small description that will also appear in search engines).
By doing all of this, you will increase the chances of your article being more visible on Google, Bing, etc.
![]()
Rank Math interface which will allow you to refine the SEO of your article before publication © iPhon
One last little tip: if you want your blog to gain notoriety, try as much as possible to publish articles constantly. Several times a week is an excellent rhythm, for example.
In the world of blogging, regularity is key!
7) Continue learning WordPress
You now know how to create your WordPress blog. You must now familiarize yourself with the administration interface, publish articles regularly, make your blog known, and try to retain your audience.
To summarize, there is still a lot of work to be done. This is just the beginning of the adventure for you and your blog!
To help you improve your skills, we strongly recommend that you browse the various guides that we regularly publish here. And of course, don't hesitate to rely on the many other guides and tutorials available on the Internet.
Whether in English or French, you will have plenty to do.
Conclusion
Our complete guide on how to create and upload a WordPress blog is already coming to an end. We hope you were able to complete each of the steps listed. As a reminder, we advise you to subscribe to one of Hostinger's hosting offers in order to deploy your blog.
Create your WordPress blog with Hostinger
In any case, keep one thing in mind: once the creation stage is over, you won't have to lose patience. Creating a community, gaining visibility on the Internet takes time. You will therefore have to persevere and not give up!
Don't neglect the SEO aspect either. It is important that your site appears at the top of search engines. To do this, there are quite a few things to put in place and to take into account.
In any case, we wish you success in your project of creating a WordPress blog. If you enjoyed our complete guide, consider sharing it around you, on social networks, and other platforms.
Frequently Asked Questions about creating a WordPress blog
To definitively conclude our guide explaining how to create a WordPress blog, we are going to answer some questions that often come up.
Can I create a blog without web hosting?
This would be wonderful because creating a WordPress blog would be completely free. Unfortunately, this is not the case. You will need web hosting in order to put your site online. If your goal is to create a WordPress blog with a professional design, fast, and therefore capable of welcoming a lot of visitors, you will need to invest in good web hosting.
With this in mind, we recommend that you opt forHostinger which offers excellent WordPress hosting from €1.49 per month. In addition, you will be entitled to this price, to a free domain name. If you don't want to use WordPress, we advise you to take a look at ourguide on how to start a truly free blog.
How much does it cost to create a WordPress blog?
Creating a quality WordPress blog doesn't have to be expensive. By choosing a host likeHostinger(and its plan available from €1.49 per month), your only additional expenses will be: the purchase of a theme (there are also beautiful free themes) and plugins (to start you can get by with the free versions). If you feel capable of managing the entire administration part, a WordPress blog will not cost you more than 30 euros per year in a “beginner” configuration. Do you have slightly more substantial web hosting needs? In this case, the bill will be around €50 or even €100 per year. We haven't specified it, but in any case, by opting for Hostinger, you will be entitled to free SSL certificates.
How to make money on your blog?
It is possible to earn money via your site through different processes. The first is to place advertisements. Each advertisement that is seen will earn you a few cents. The second way to monetize your site is affiliation. By recommending certain products and services, you can hope to receive a commission as soon as a visitor to your site makes a purchase. To achieve this, you will need to register with an affiliate program like Amazon, Fnac, Cdiscount, place links and/or buttons in your articles and pages, and that's it!
Is it possible to design a blog without knowing how to code?
Yes it is entirely possible, especially if you decide to use WordPress. Thanks to plugins (nicknamed Pages Builders), you can personalize your site from A to Z with a simple click/drag. To give you a few names, we think for example of plugins like Elementor, Divi Builder, or even Beaver Builder. With them, and without even having any knowledge of web development, you will be able to make your pages and articles even more beautiful and professional.