In 2017, with iOS 11, Apple introducednew image and video formats. This is theHEIFfor pictures andHEVCfor videos. Their advantages at the time over the more traditional JPG and H.264 formats were clear: anoticeable weight gain. Apple then announced storage space that could be halved with HEIF photos compared to JPG/JPEG.
The other side of the coin, thelimited supportof these formats excluding recent Apple products. Indeed, you may encounter problems when sharing a HEIF image to a friend on an old Android smartphone for example. Or more simply, when getting a HEIF image from your iPhone to work on your Mac, your editing application may not open the file and you find yourself stuck. So let's see how to manage to no longer suffer from the use of these homemade formats on iPhone and iPad.
Last clarification before going further: today we are talking about filesHEREfor photos and videos taken on iPhone. HEIC is a “container”, a file format that can store photos in HEIF and videos in HEVC. For reasons of simplicity, we therefore only use the name HEIC in our guide, which includes, as you will have understood, the two types of photo and video files made by Apple.
1- How to force photos to be saved as JPG
iOS offers a setting that allows you to define in which file format your Camera app saves photos:
- Go to the Settings app
- Search for “Camera”
- Continue to “Formats”
© iOS screenshot by iPhon.fr
To date and with the current version of iOS, two options are offered on the screen:
- High efficiency:when this option is chosen, photos and videos taken with the Camera app are saved in HEIC
- Most compatible:when this option is activated, photos taken with the Camera app are saved in JPG, videos in H.264
Be careful though, by choosing “Most compatible”, you can no longer record videos in 4K at 60 frames per second and in 1080p at 240 frames per second.
We advise you to choose “High efficiency”, because there are manipulations which will allow you to carry out the HEIC to JPG conversion later, particularly when sharing. Additionally, you will enjoy file with aexcellent quality/weight ratio.
2- How to choose to change to JPG when sharing
Here's what you can do to make sure you share your photos as JPG:
When sharing wirelessly (by email, app, AirDrop, cloud, etc.)
- When you share a photo from your photo library, tap “Options” at the top
- Choose “Most compatible” to ensure sharing of the file in JPG format (Automatic can also work, but with some hiccups sometimes)
© iOS screenshot by iPhon.fr
- Then select the target of your sharing, AirDrop, Mail, Messages, etc.
Please note, this manipulation applies to a single image or a selection of images. Once the sharing has been completed, for the next sharing, you must repeat the operation.
When connecting wired to a Mac or PC:
- Go to the Settings app
- “Photos” section
- At the very bottom, in the “Transfer to Mac or PC” paragraph, choose “Automatic” to transmit your files in JPG. The other option, “Original Files,” shares the file as is, whether in JPG or HEIC format

© iOS screenshot by iPhon.fr
3- How to convert multiple images to JPG
You can convert one or more photos from your photo library to JPG without even sharing them. To do this, there are several methods.
3a. The first “MacGyver” method
- Go to Safari on the websiteheictojpg.com
- Tap in the large white box to select up to 5 photos to convert
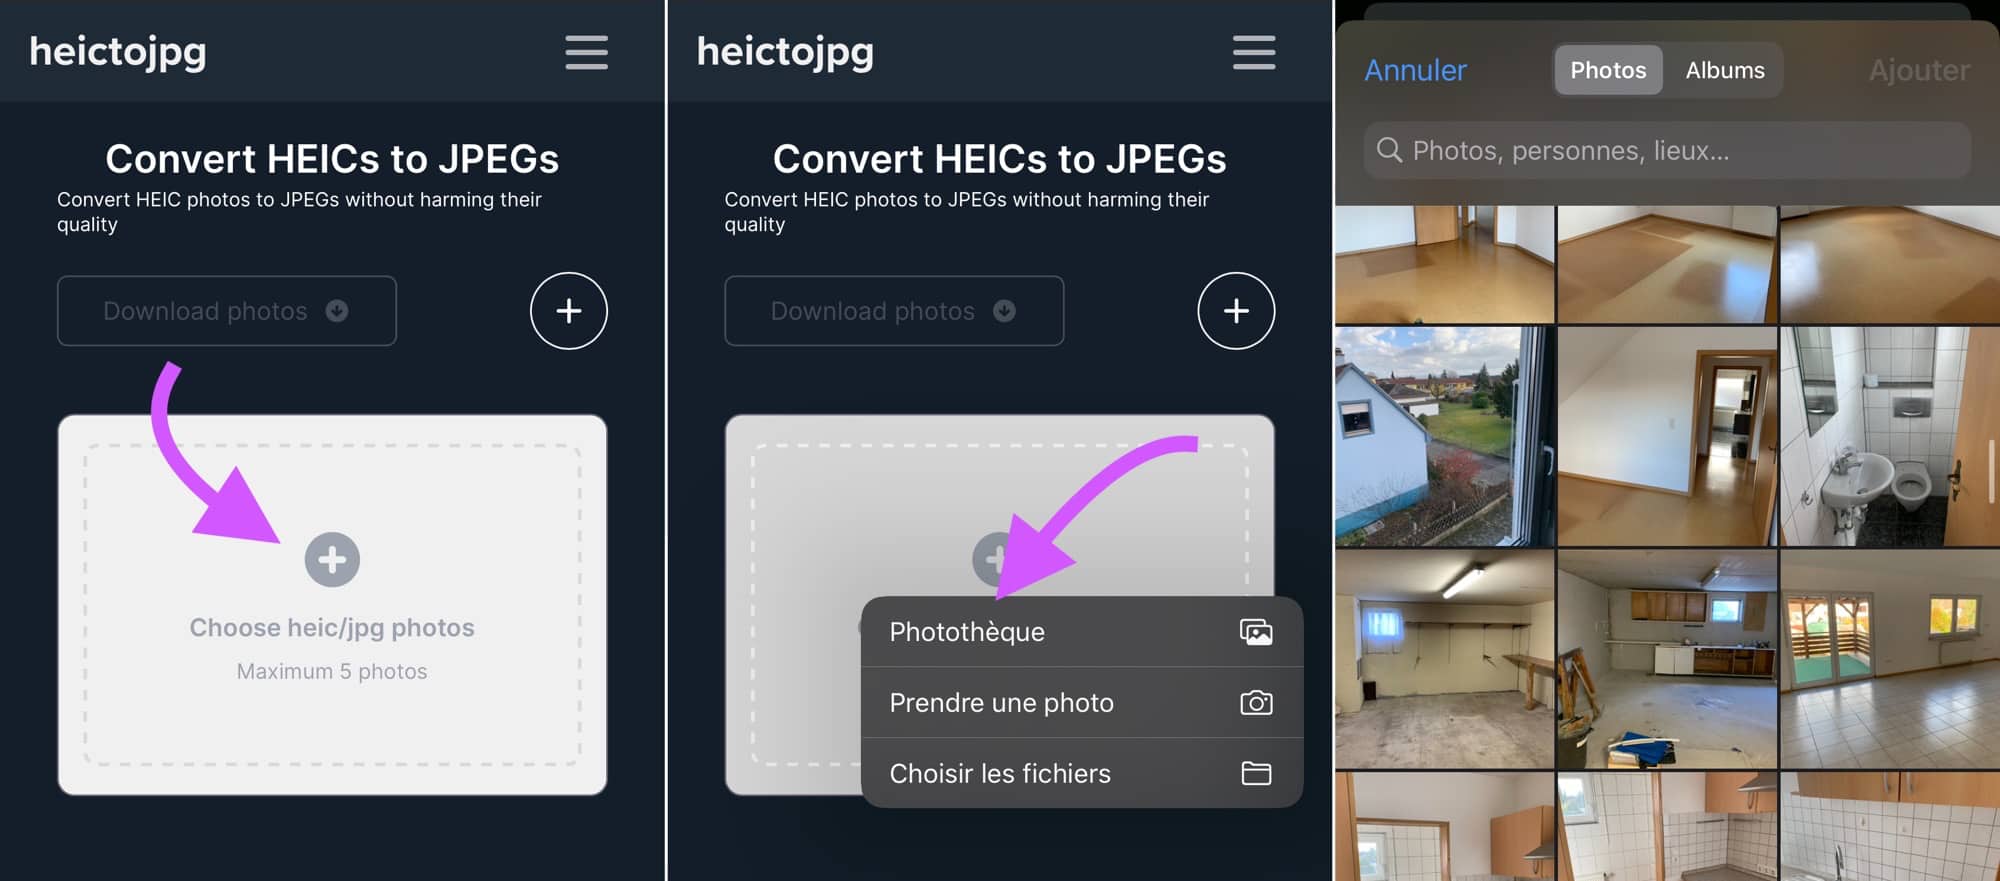
© iOS screenshot by iPhon.fr
- The conversion starts automatically once the selection is made and validated by clicking “Add”
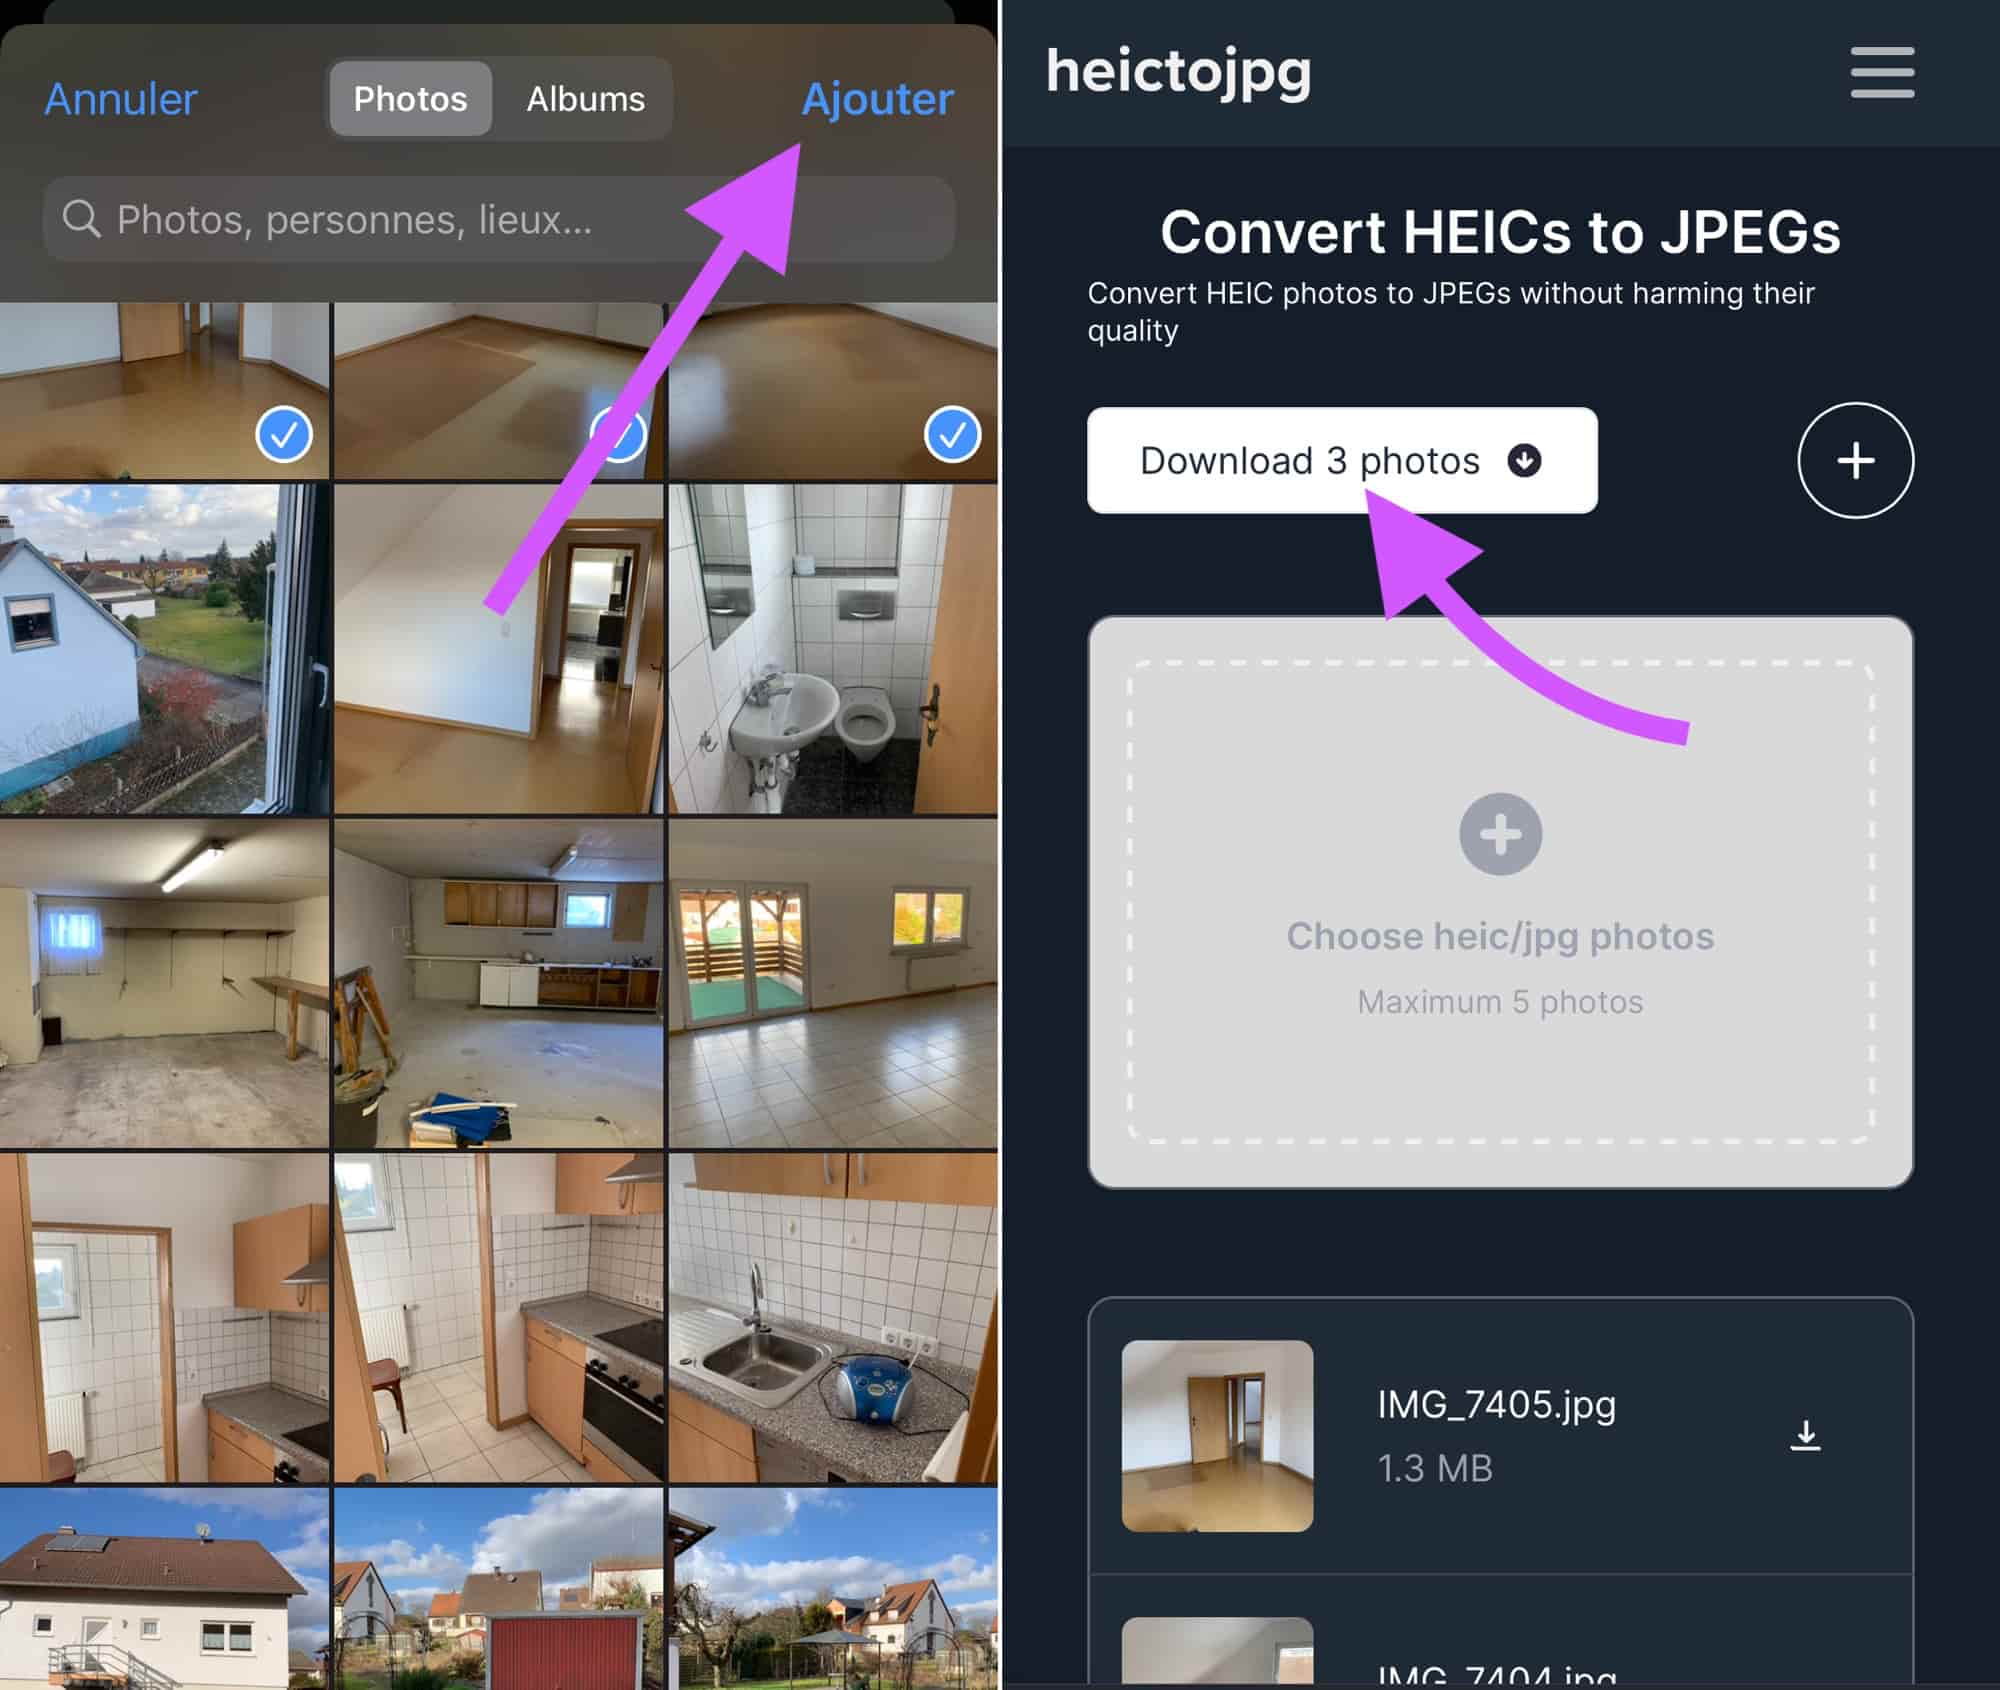
© iOS screenshot by iPhon.fr
To download photos converted to JPG, two solutions:
- press either “Download -number of photos- photos” at the top, which gives you a compressed .zip file containing the files
- or tap each image at the bottom of the page to open the JPG photo and save it manually to your photo library
You see it,this way is not the most practicalto convert one or more photos from HEIC to JPG. Fortunately, we have better to offer you
3b. Thanks to third-party applications
Several applications are available on the App Store and capable of performing the conversion more simply than the site seen above. They arefreefor the most part. The other side of the coin is that they are oftenfilled with advertisementsand not very ergonomic or even quite simply pretty. These are the two applications that we recommend at this stage.
JPG/PNG Converter
JPG/PNG Converter is the simplest and most straightforward app of its kind. A small advertisement appears at the end of the conversion, but the app nevertheless has the merit of being fast and practical. Load all the photos you want to convert into it, then choose the first option (.jpg), and that's it.
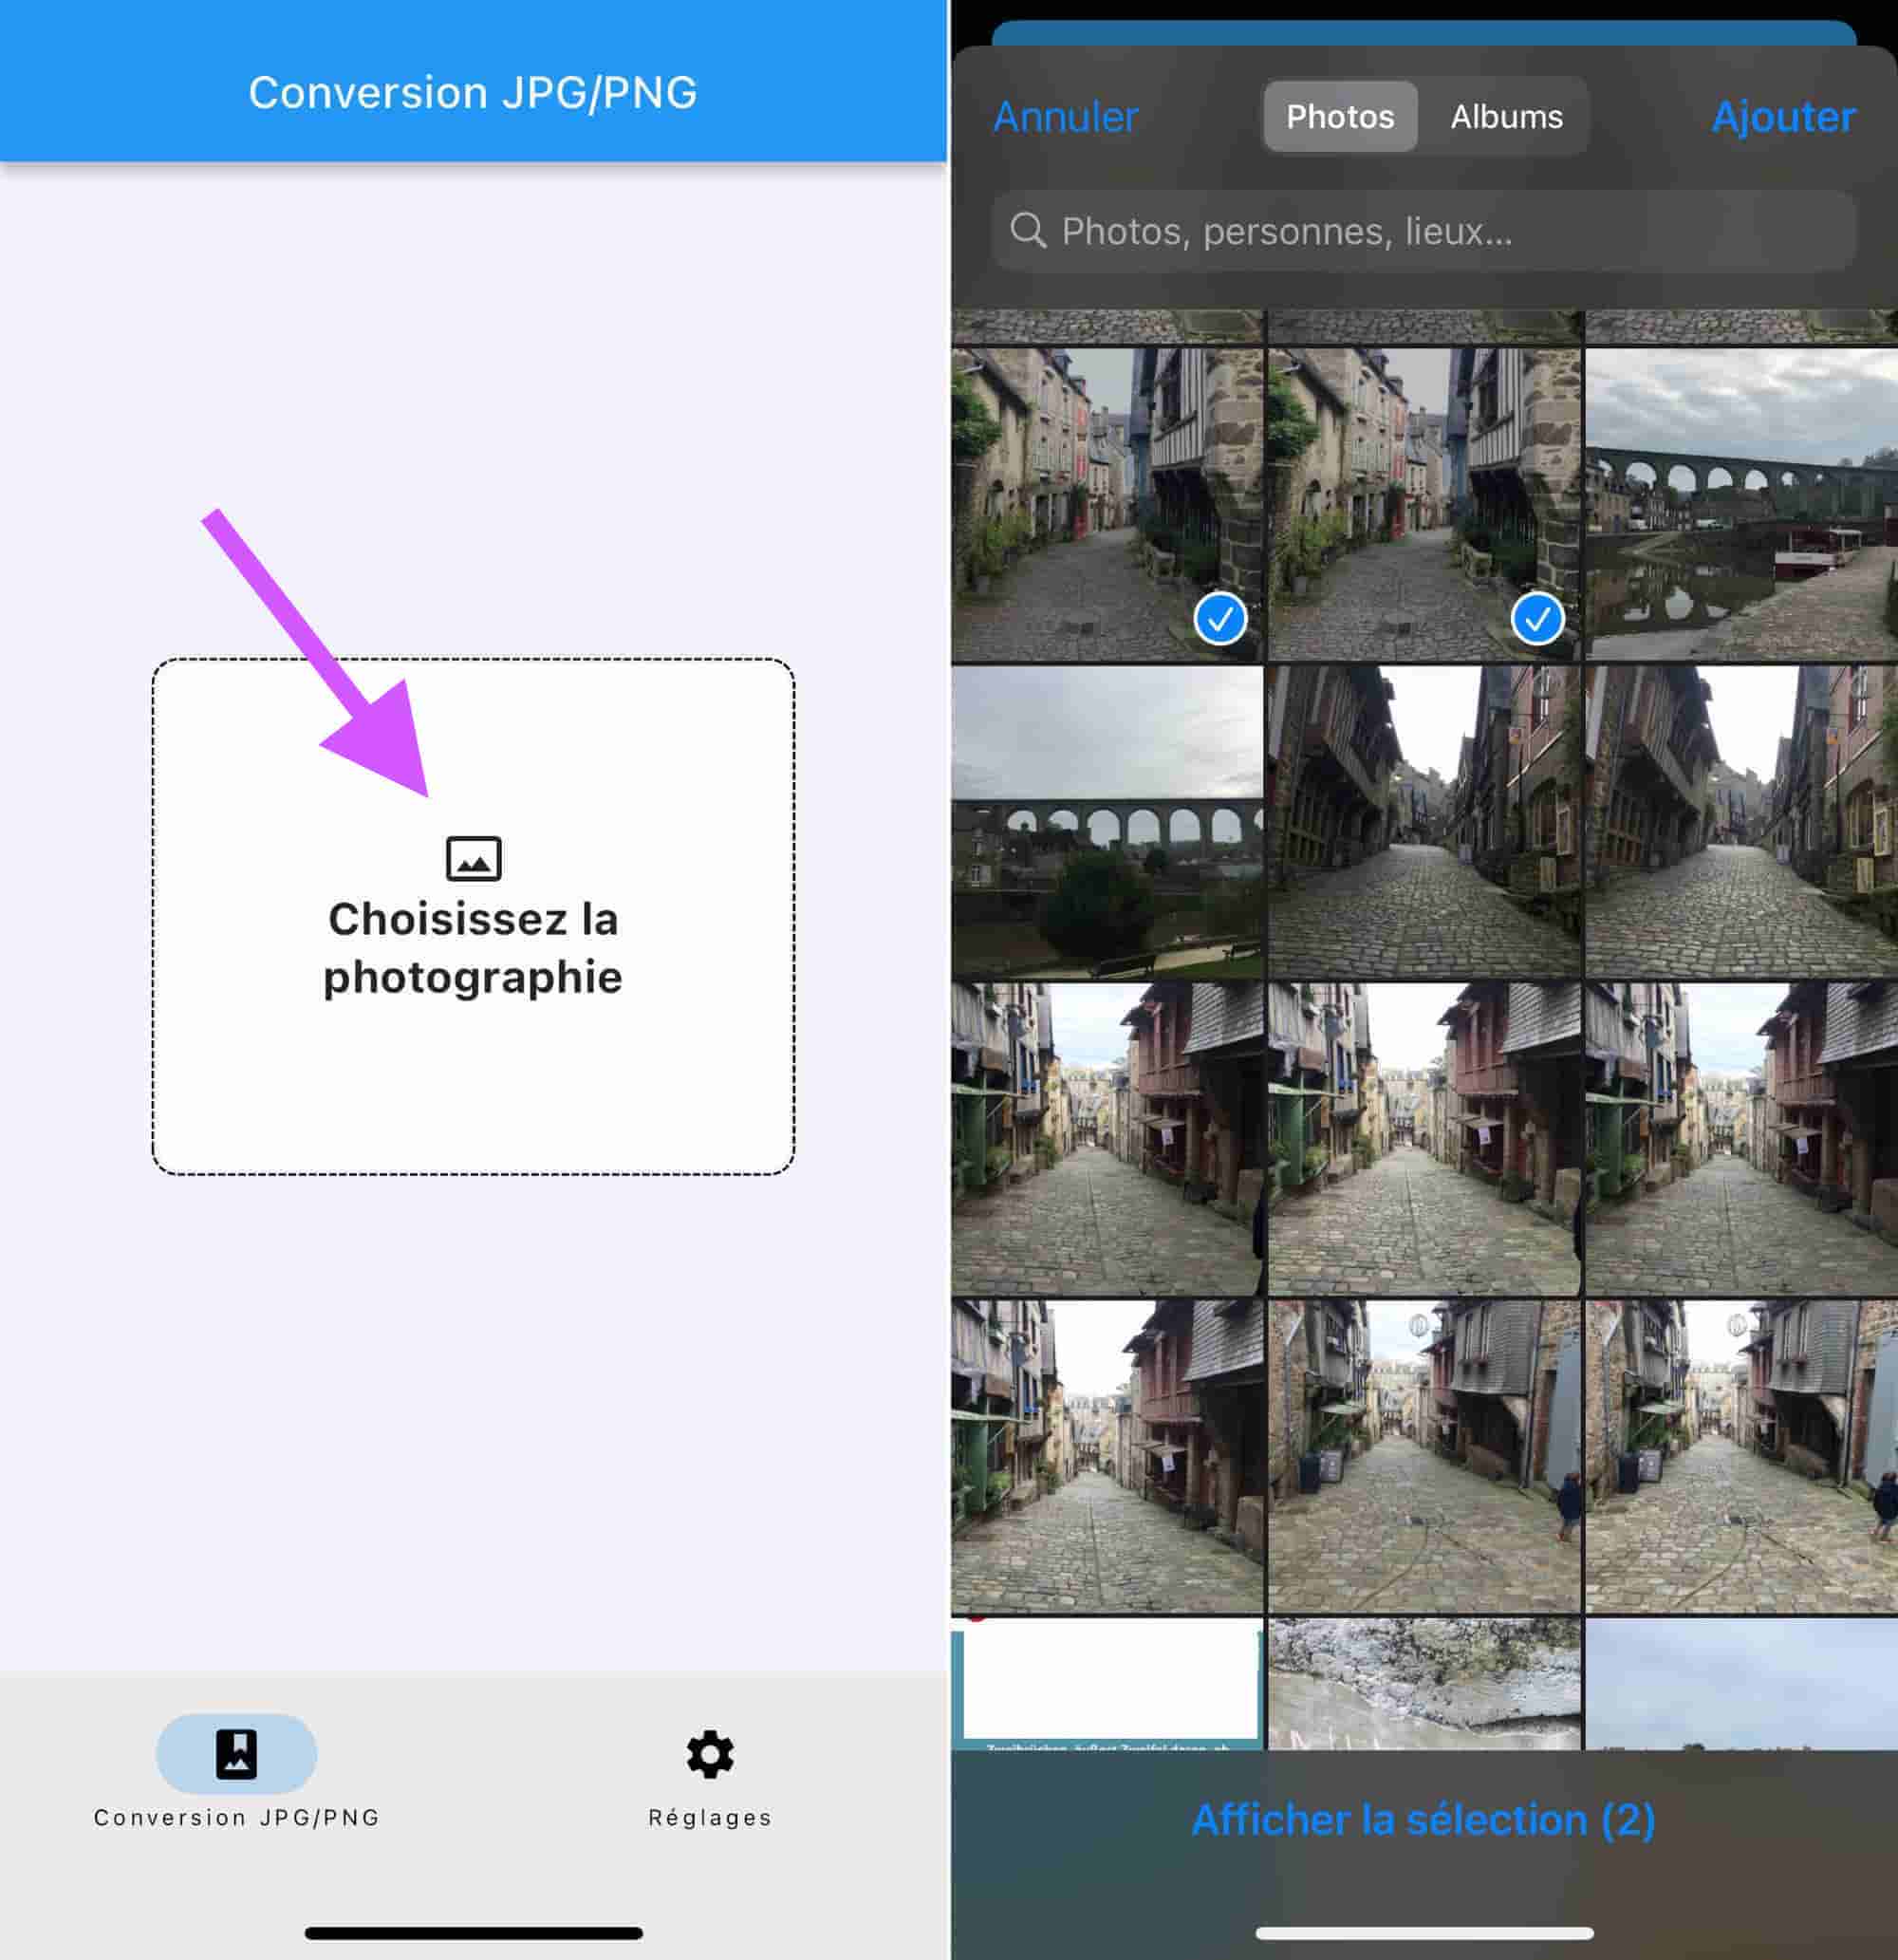
© iOS screenshot by iPhon.fr
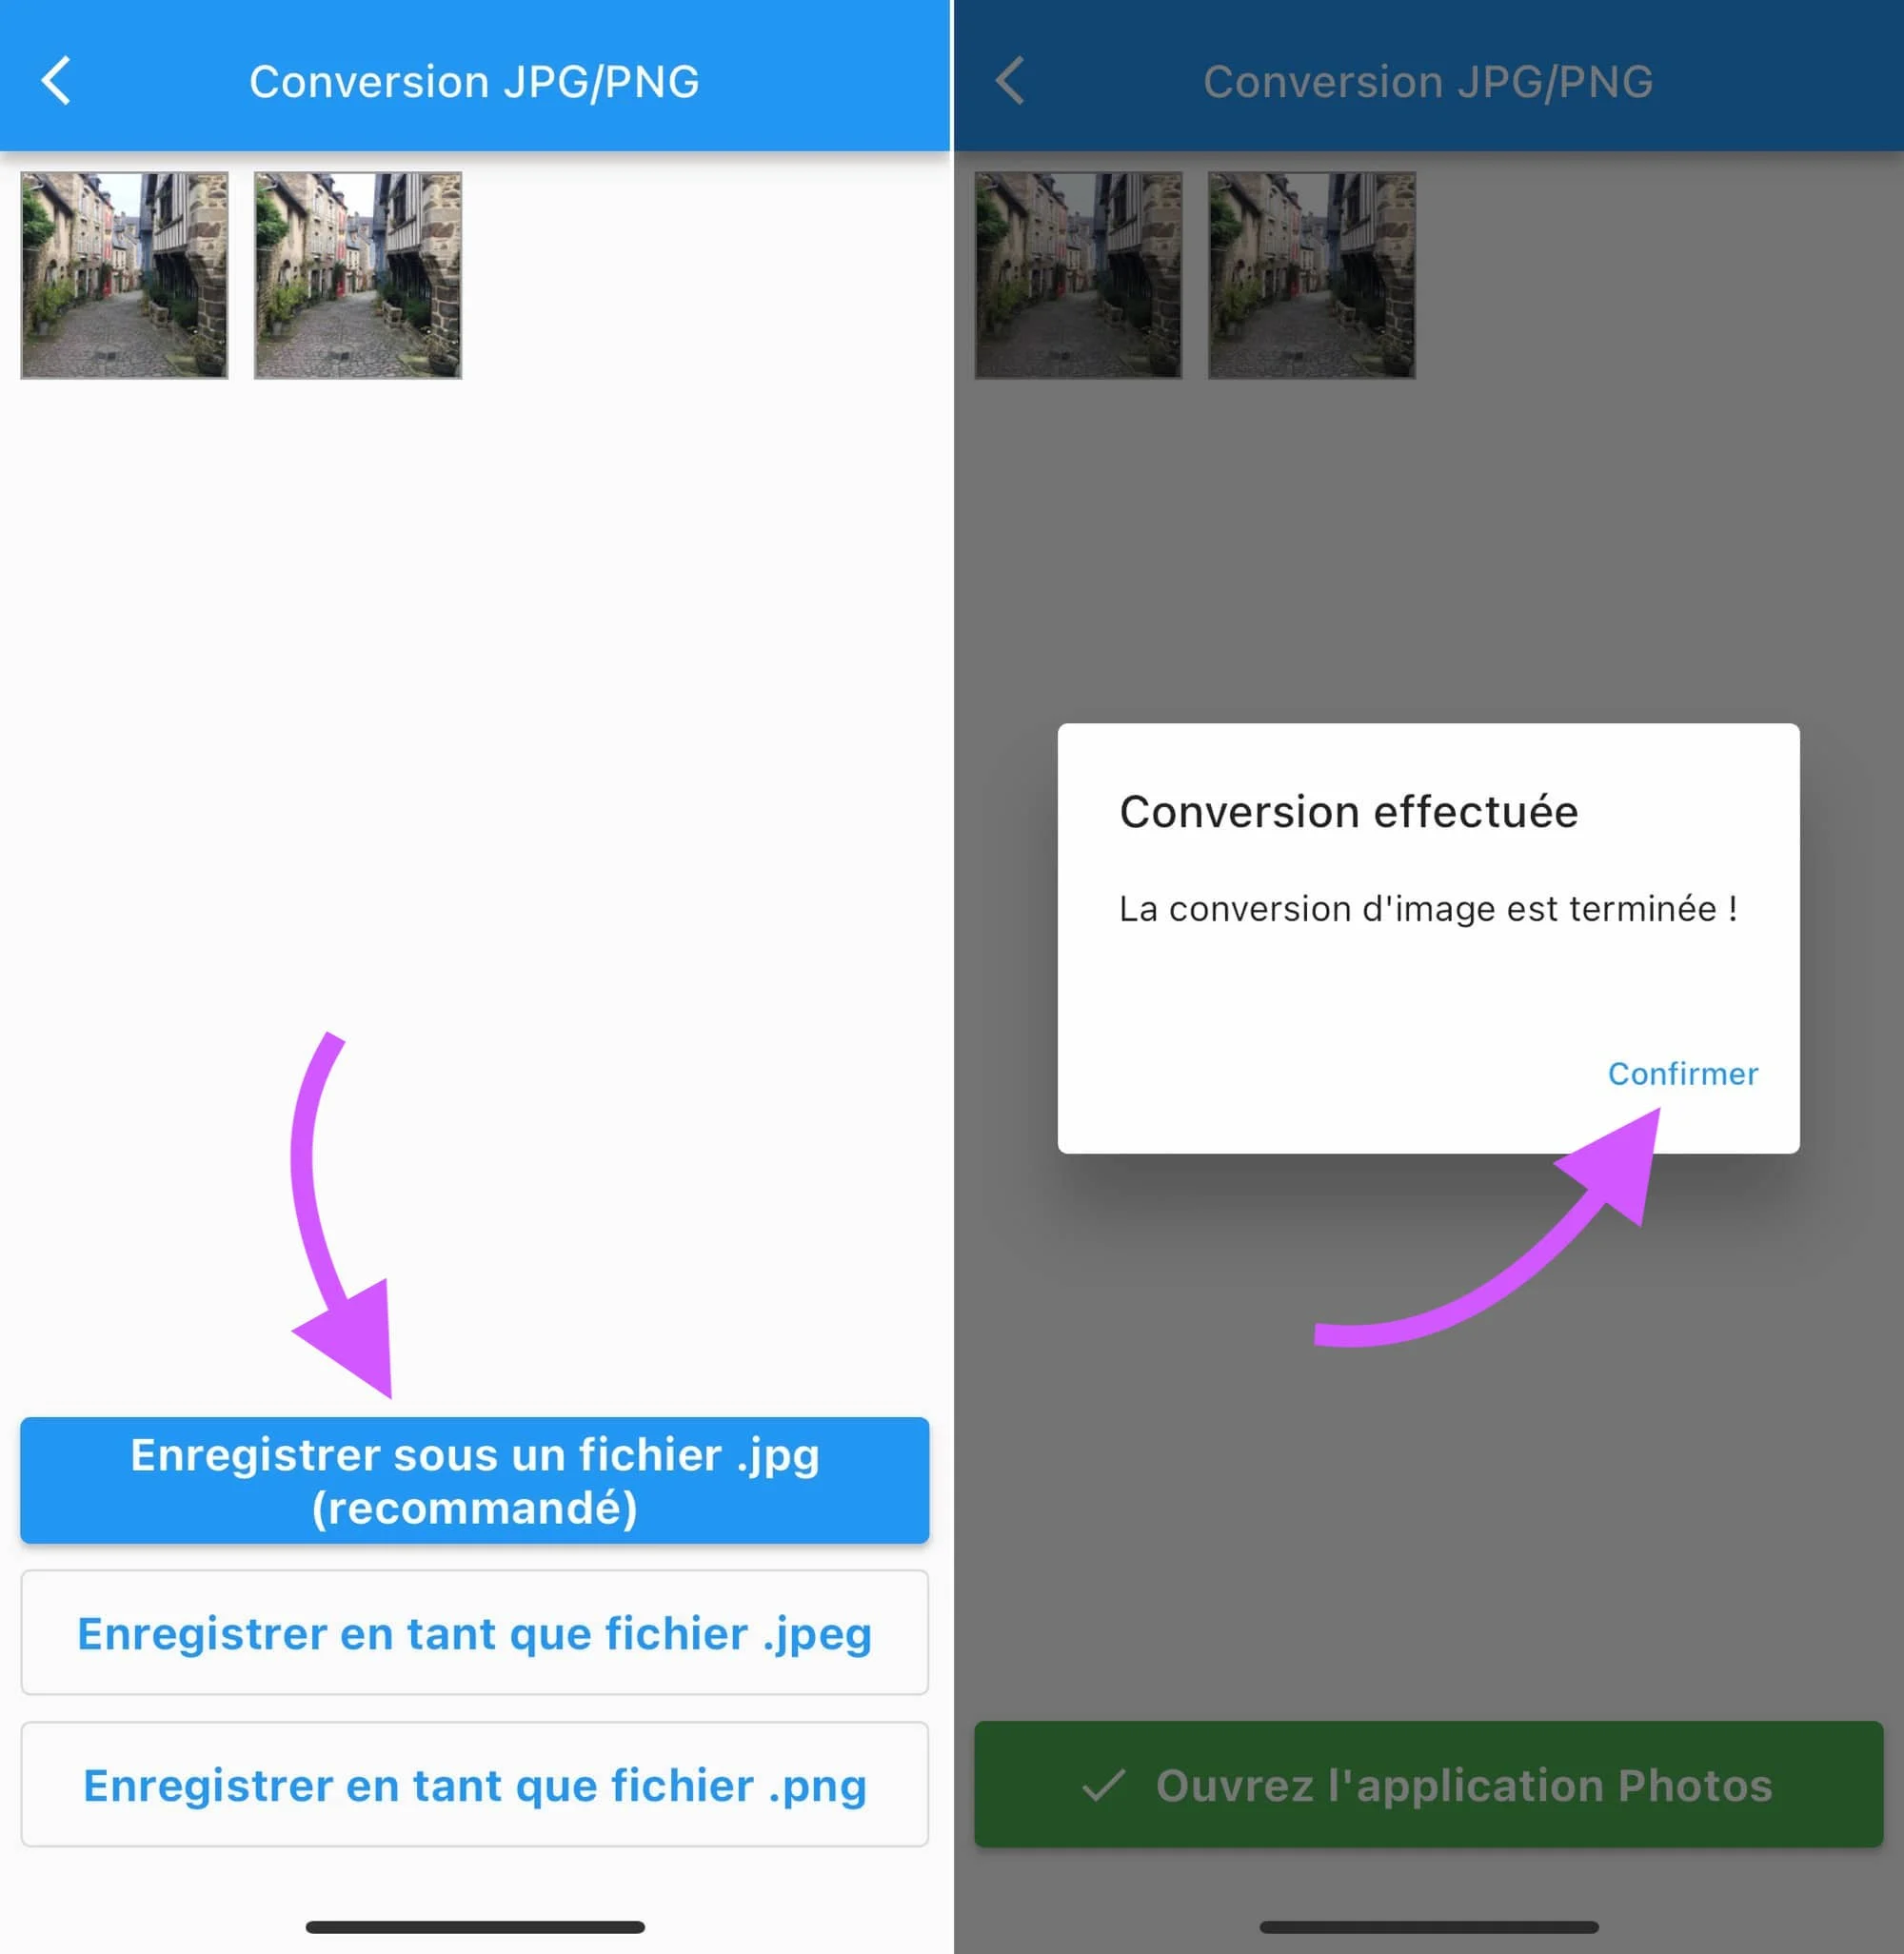
© iOS screenshot by iPhon.fr
Documents de Readdle
Documents is an application that I really like. I mainly use it to access a personal server via FTP connection. But it has many other uses. It includes a web browser, a VPN, a local file browser, but also a media player and a file converter. The icing on the cake is that many of its functions arefree. And it will be very interesting for us with our images in HEIC format. The app can very simply convert a HEIC image from the iPhone's photo library into a JPG format file. The procedure is very simple and allows batch conversion as well. Here it is detailed:
- See you inMy files > Photo albumsand select the album where the HEIC photo to be converted is located
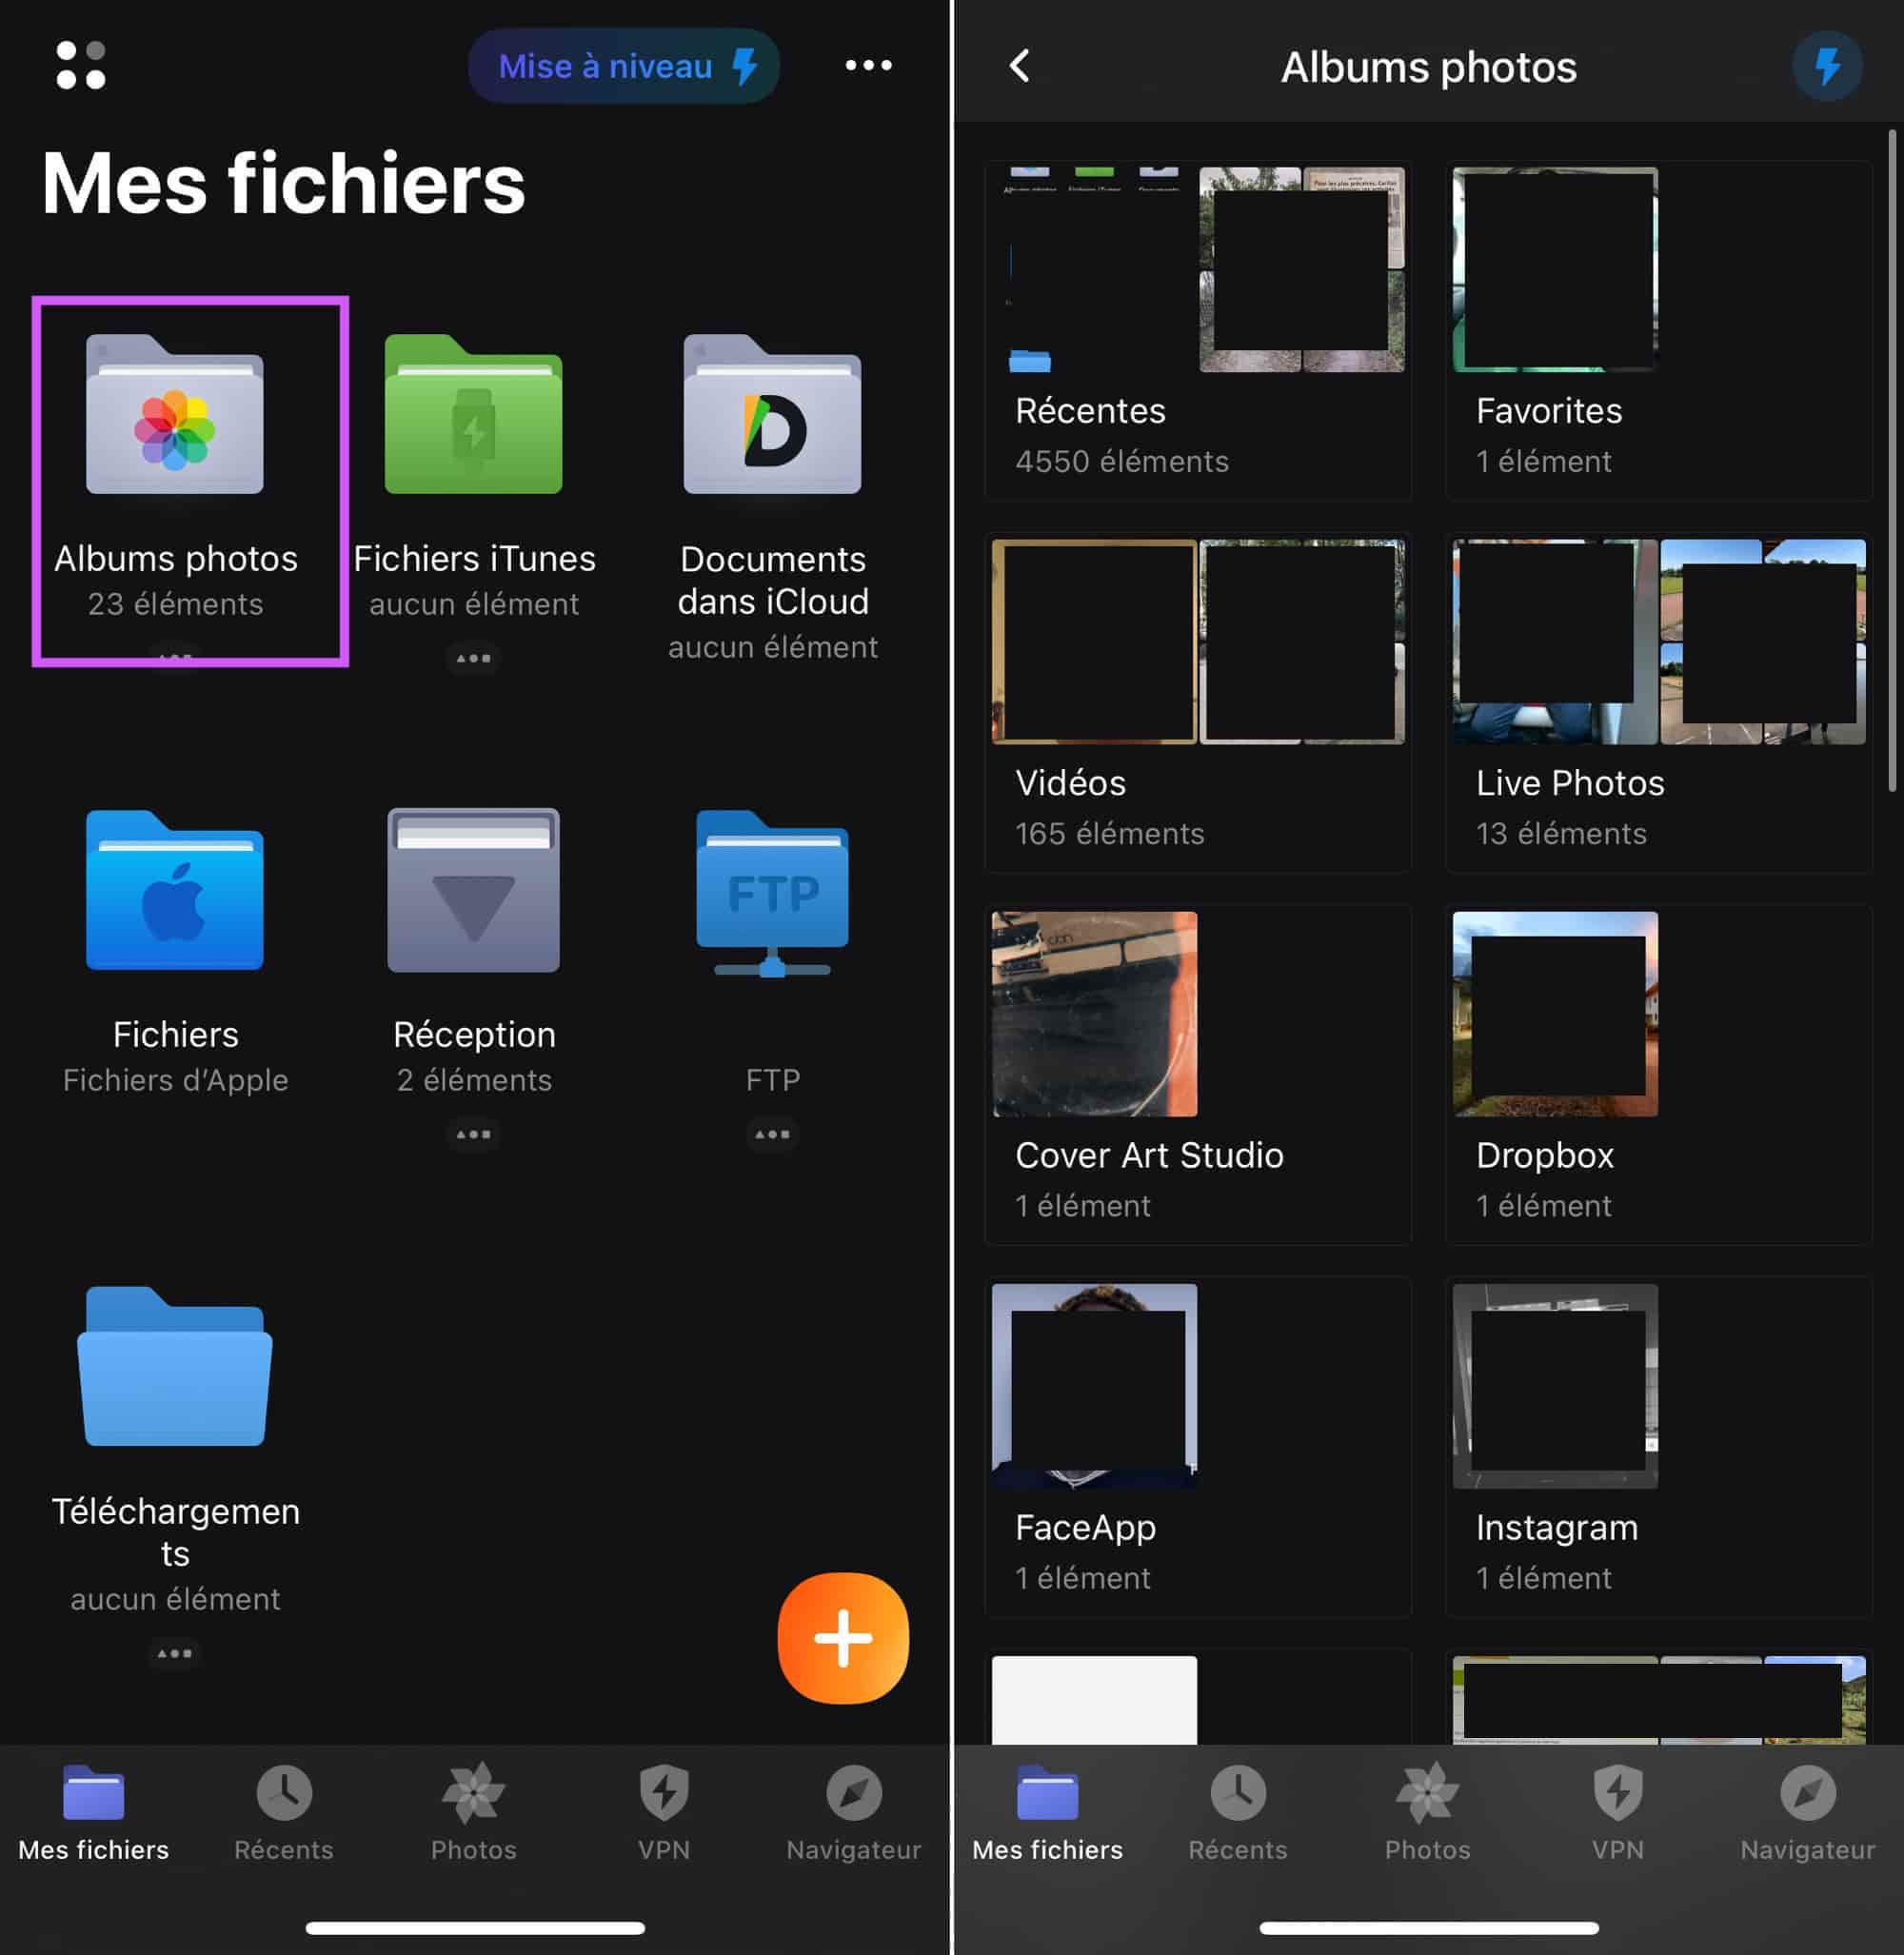
© Screenshot Documents by iPhon.fr
- Touch the three button icon at the top right of the screen and choose “Select”
- Select the image(s) to convert
- Press the three “More” buttons at the bottom right of the screen
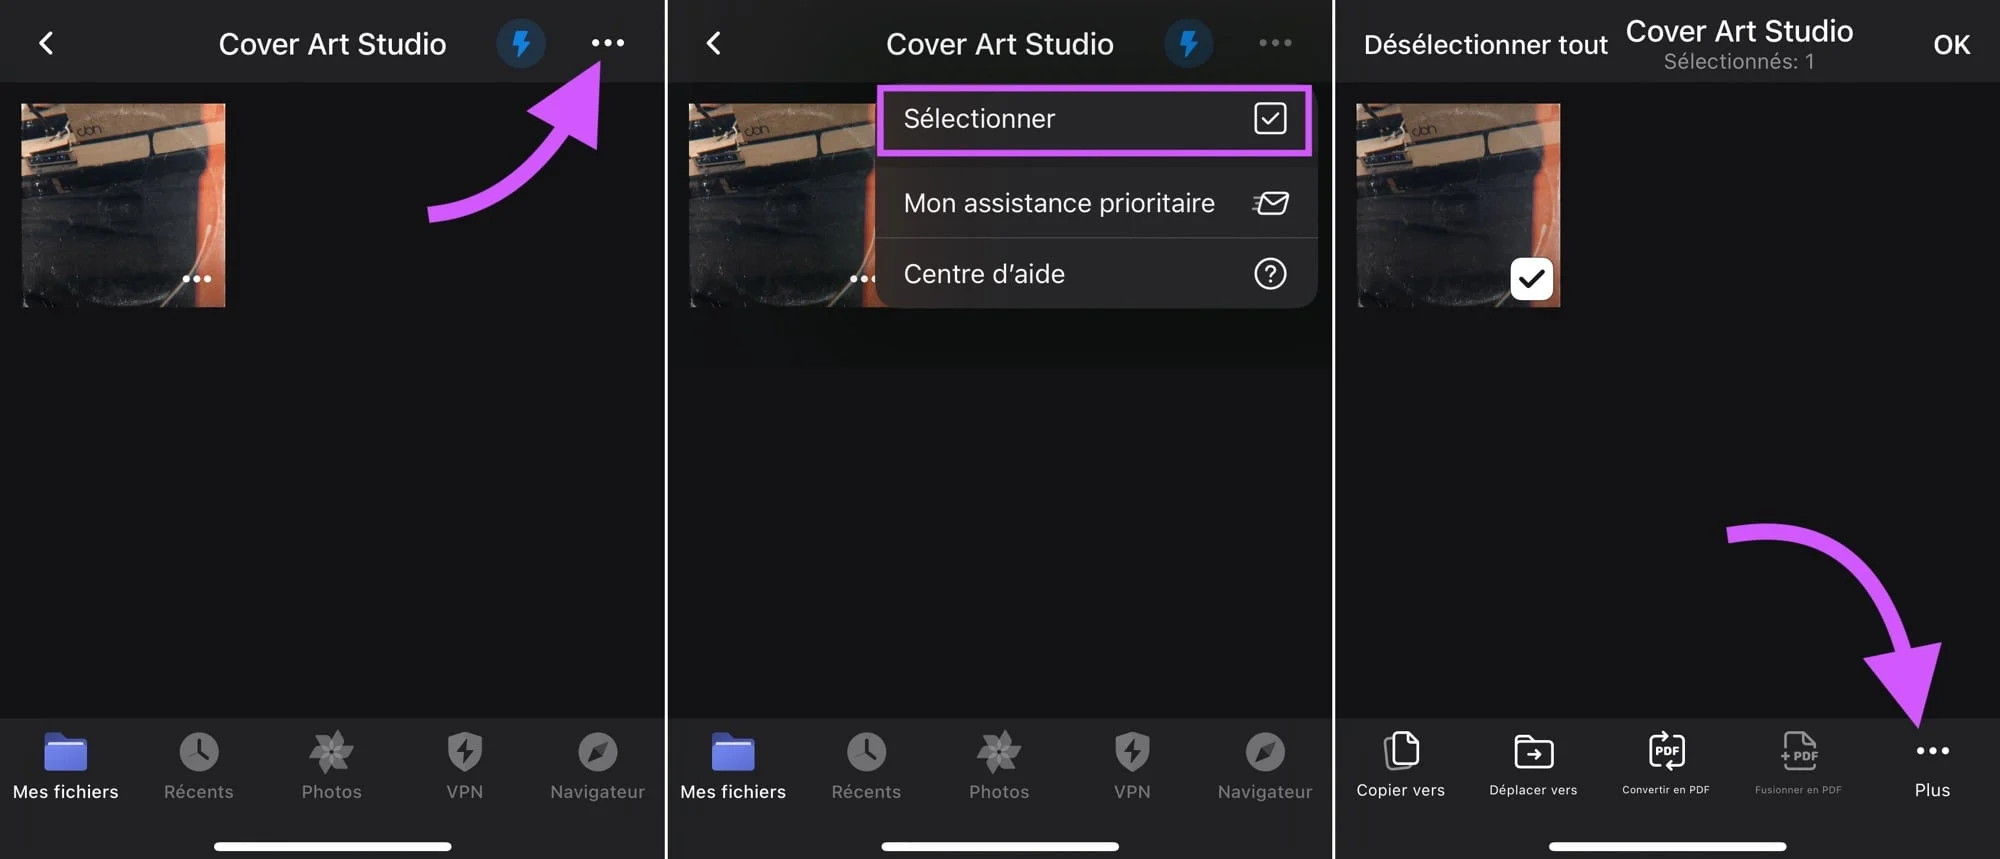
© Screenshot Documents by iPhon.fr
- Press “Share”
- Choose “Save image” or “Save x images”, which has the effect of duplicating the photo(s) and saving them in your photo library in JPG format
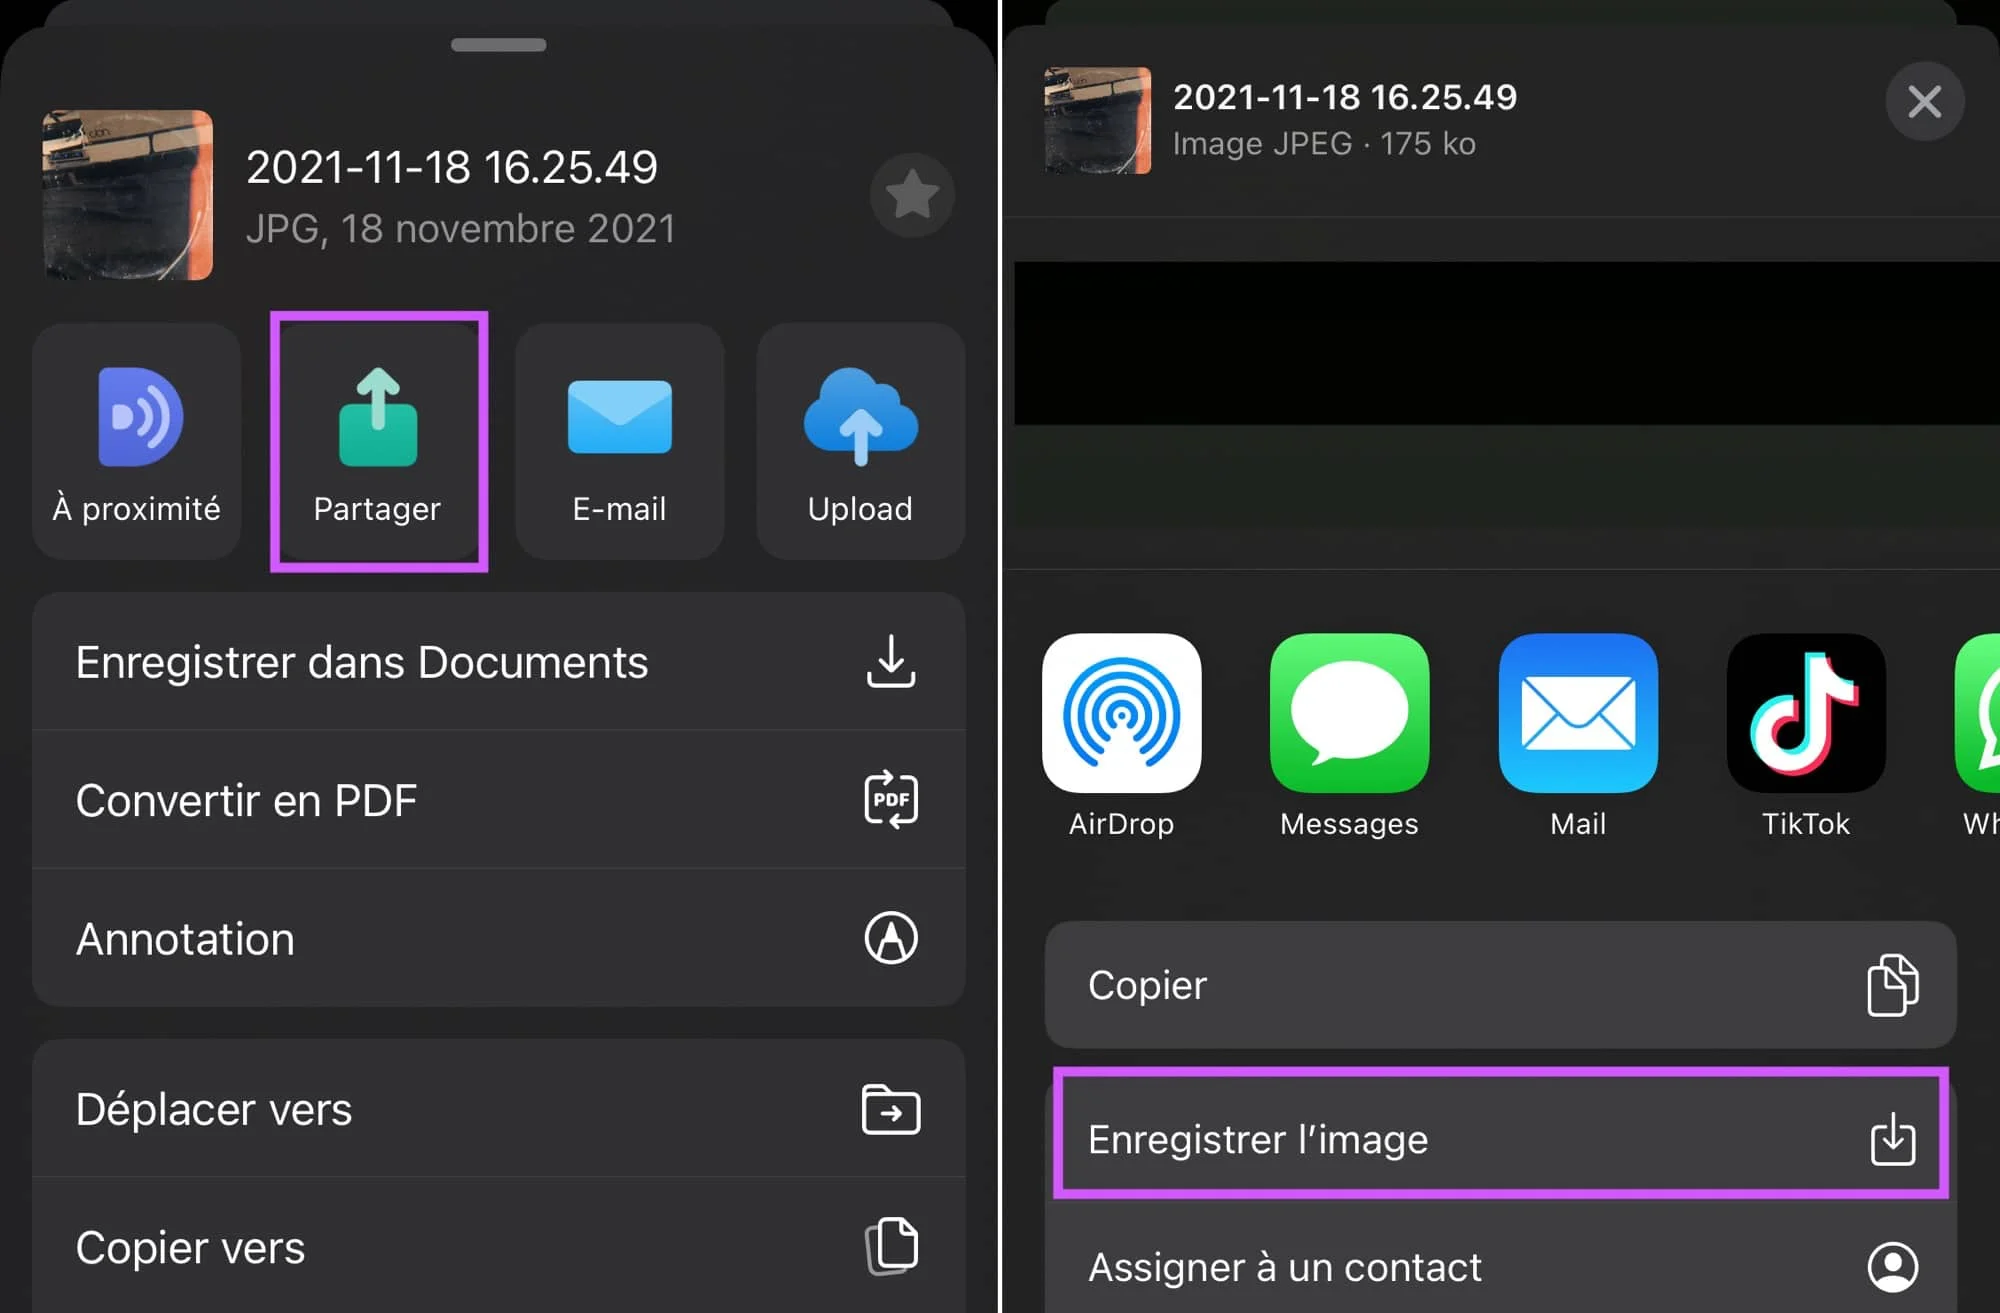
© Screenshot Documents by iPhon.fr
These two methods, 3a and 3b, present amajor drawback: the deletion of the original HEIC file after conversion to JPG is not done. You therefore find yourself in your photo library with the two files, one HEIC, the other JPG. It's up to you to do the cleaning by hand... This is why we advise you to turn to point 4, presenting the best method in our opinion:the iOS shortcut.
4- The ultimate method: the iOS shortcut
For my part, I work like this: as seen in point one, I let the iPhone record photos and videos in HEIC. When I want to force sharing in JPG, I work either with the method described in paragraph 2 without touching the “Automatic” setting, or with a shortcut built in the Shortcuts app on iOS and which I suggest you download here:
For my part, I work like this: as seen in point 1, I let the iPhone record photos and videos in HEIC. When I want to force sharing in JPG, I work either with the method described in paragraph 2 without touching the “Automatic” setting, or with a shortcut built in the Shortcuts app on iOS, as explained below.
Our “JPG Convert” shortcut
The latter can work in two ways:
- Either you launch it as an app after saving it on the home screen for example. In this case, you must then select the photo(s) to convert
© iOS screenshot by iPhon.fr
- Either, from any application, once one or more photos have been selected, when sharing, you choose the shortcut in question called “JPG Convert” from the list of options offered
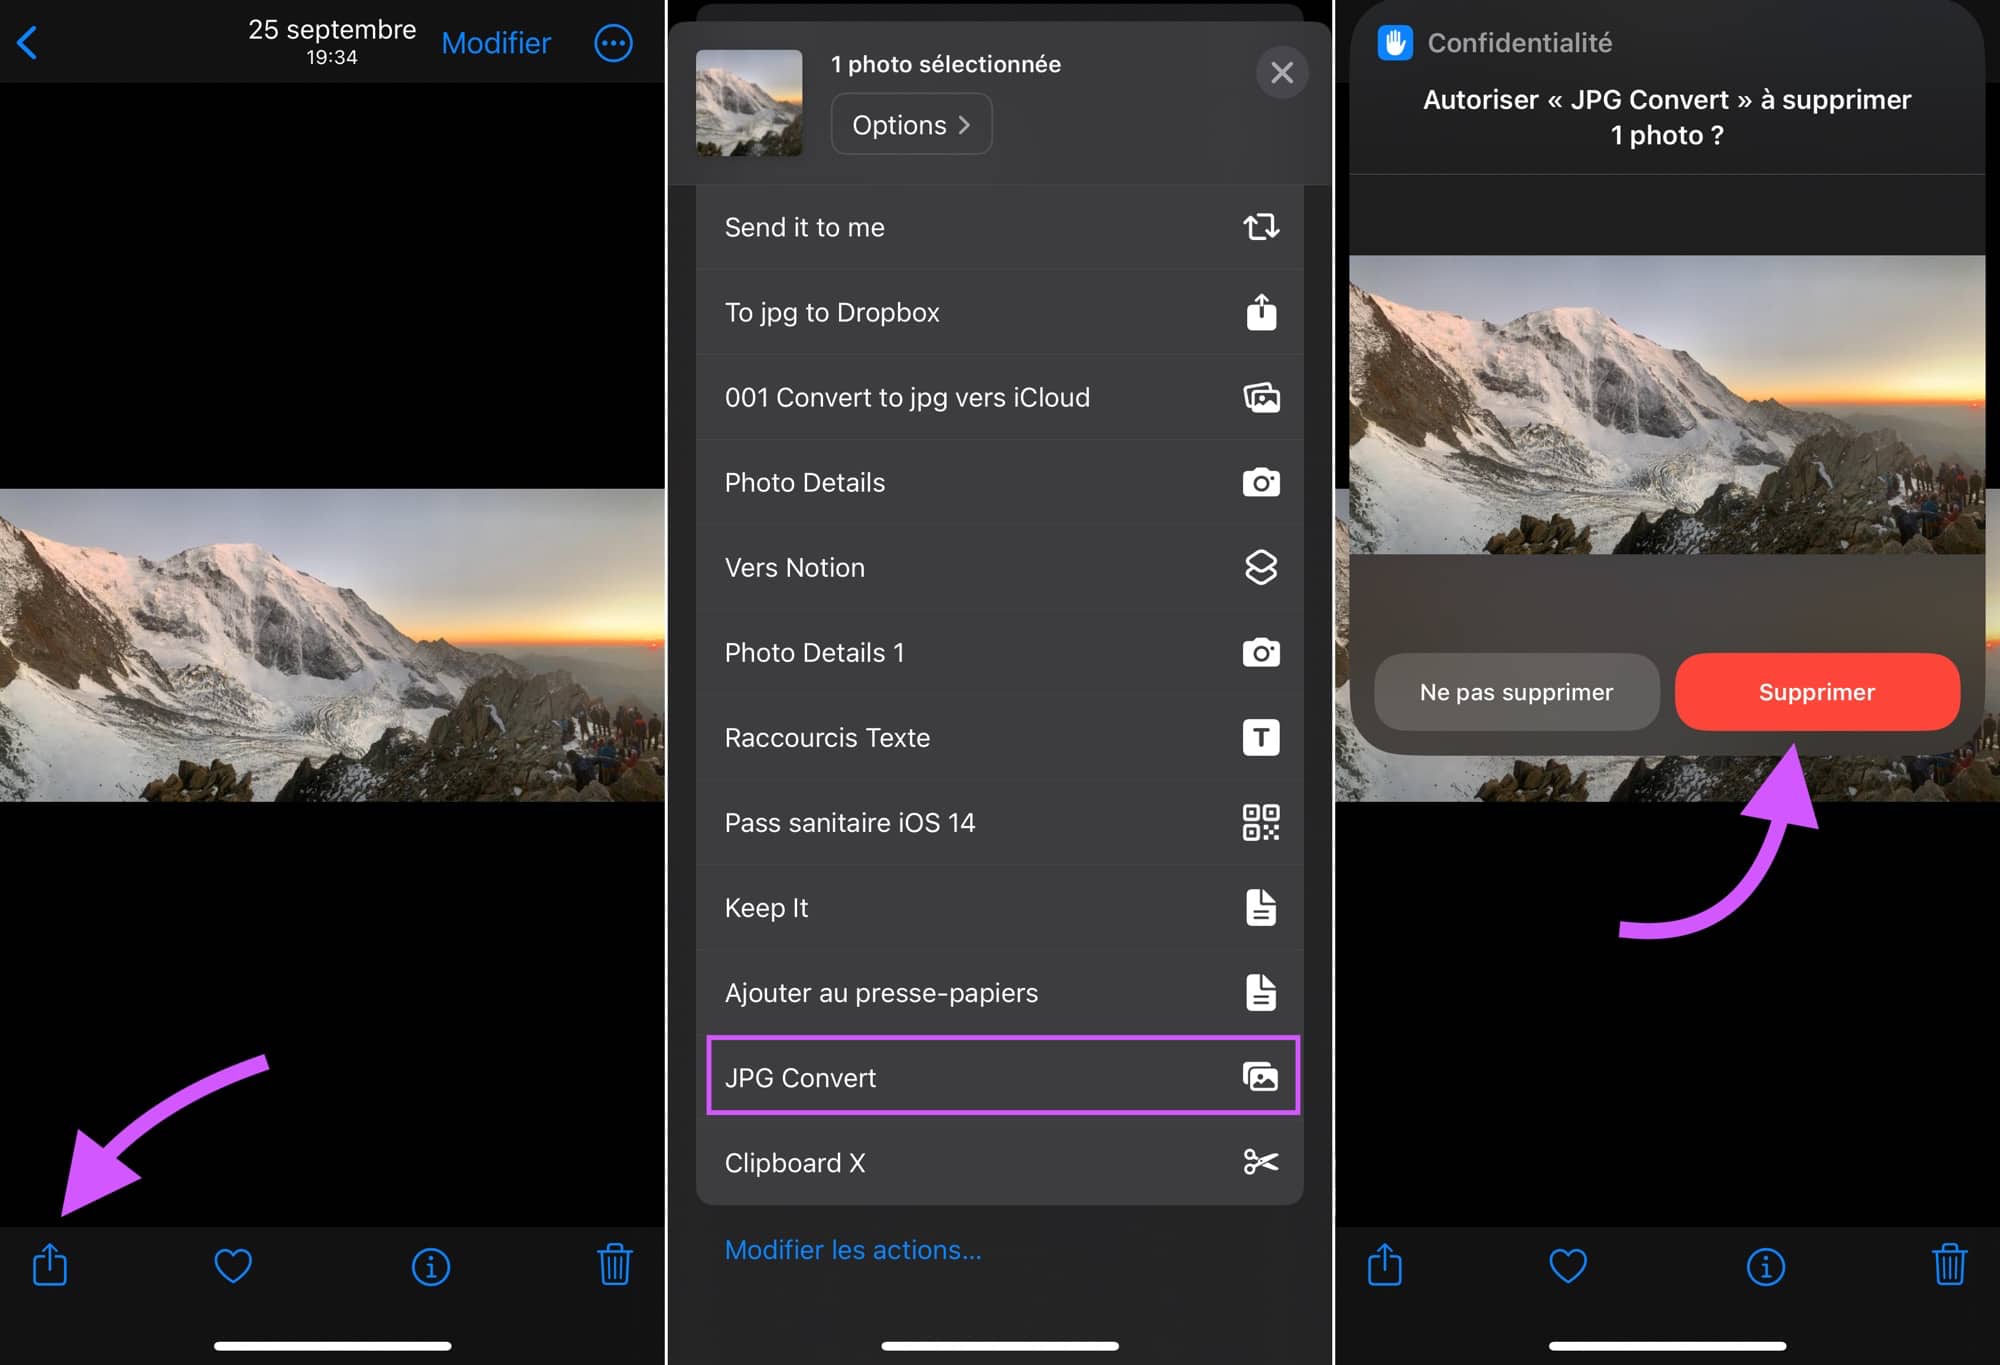
© iOS screenshot by iPhon.fr
In both cases, the selection of images is converted into .jpg files in your photo library. Advantage here, theoriginal photos are automatically deletedif you click on “Delete” at the end of the operation.
How to create a JPG conversion shortcut?
If you like our “JPG Convert” shortcut, but you want to adapt it to your uses, or if you prefer to create a new one, here is the basis of a JPG conversion shortcut:
- The most important action is: “Convert image”, import it first into a newly created shortcut for example
- In action, by pressing the small arrow, you can adjust the quality of the output file and whether it retains metadata. It's up to you, for my part, I prefer not to keep any metadata and leave the basic setting for quality
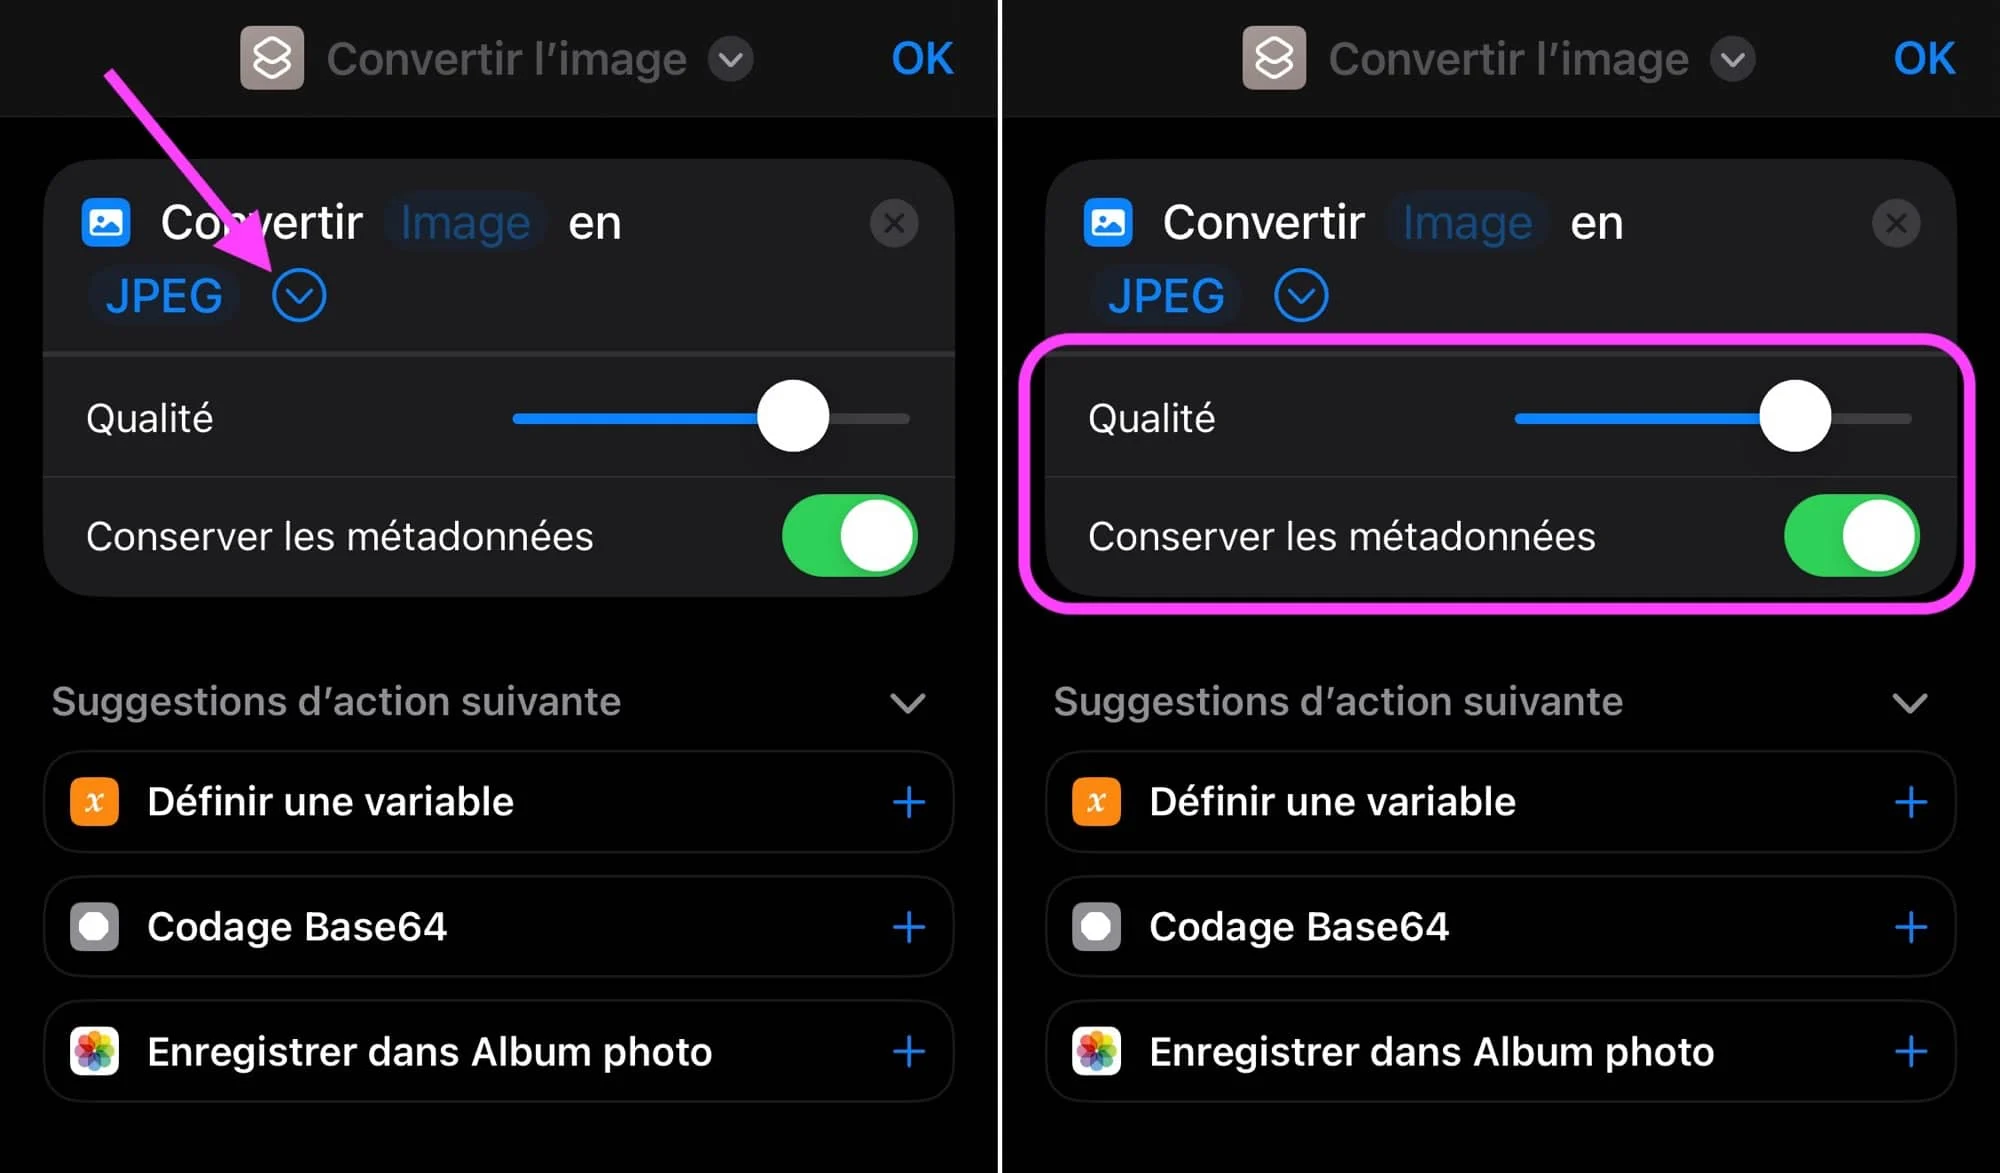
© Capture iOS par iPhon.fr
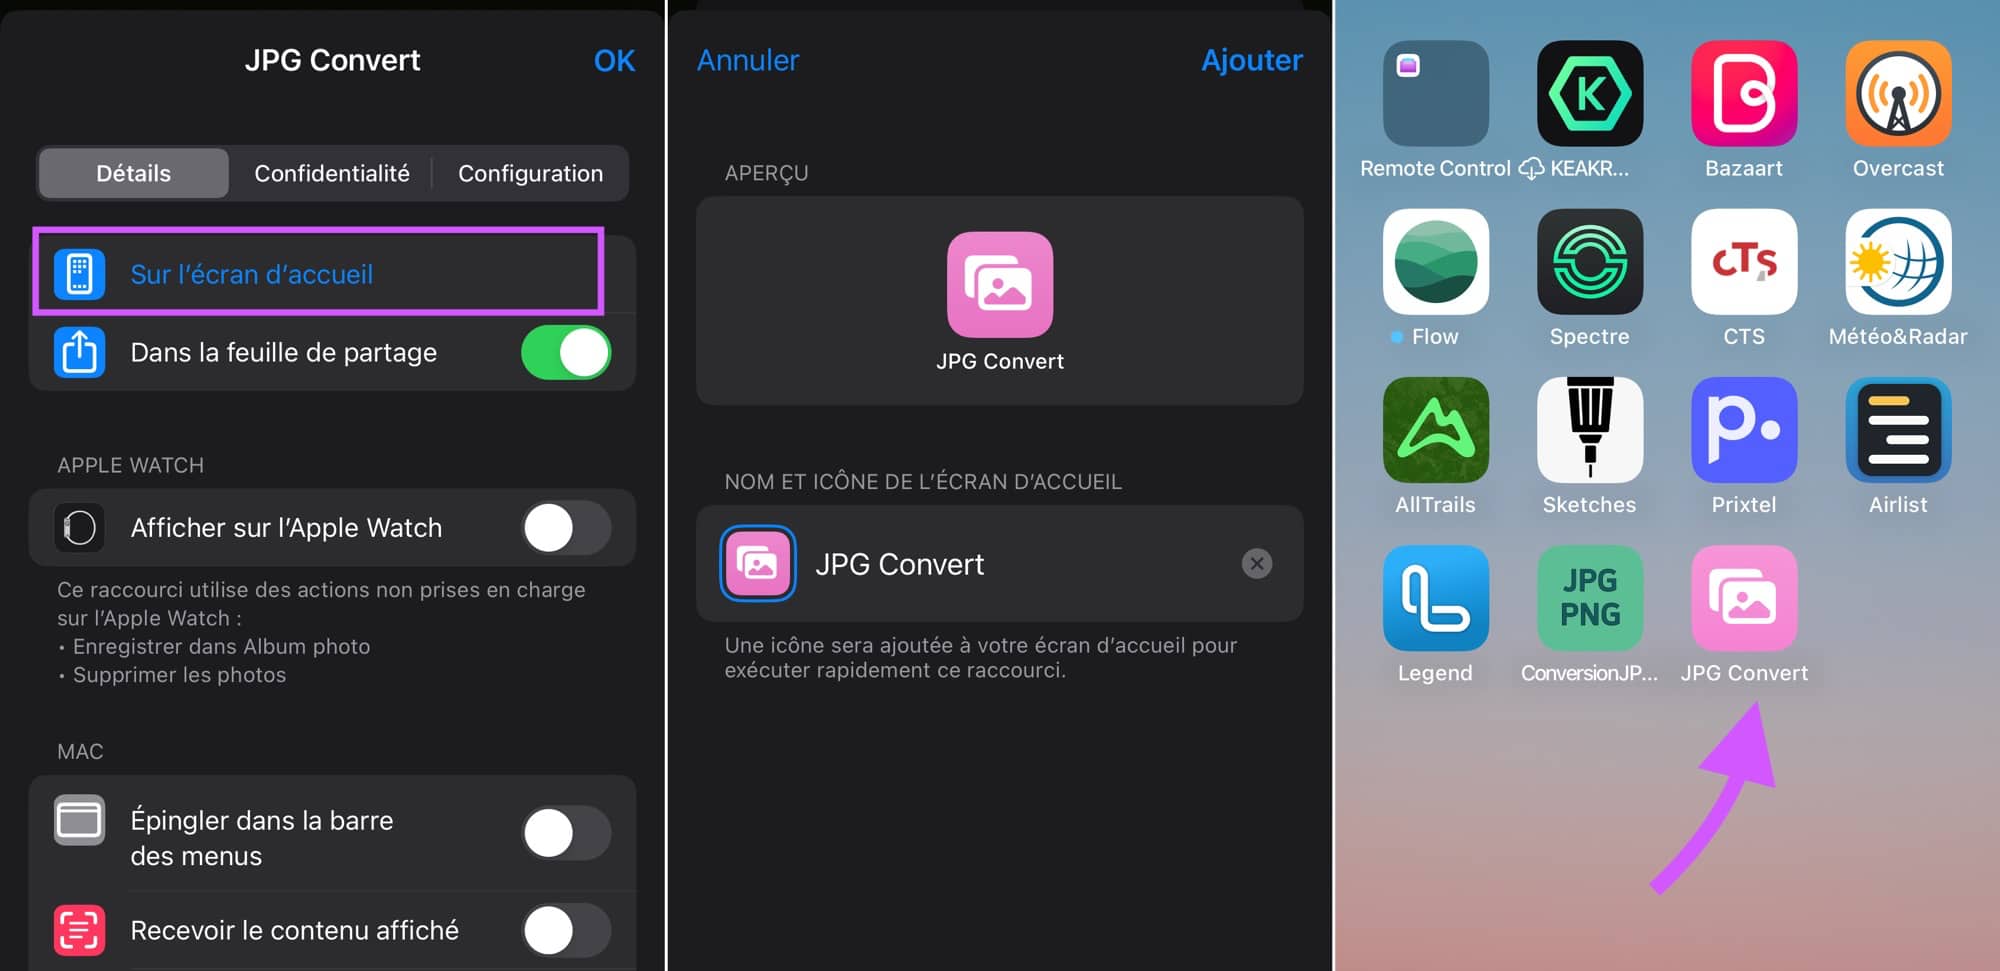
- If you want this shortcut to work in Share Sheet, tap “i” at the bottom, then enable “In Share Sheet”
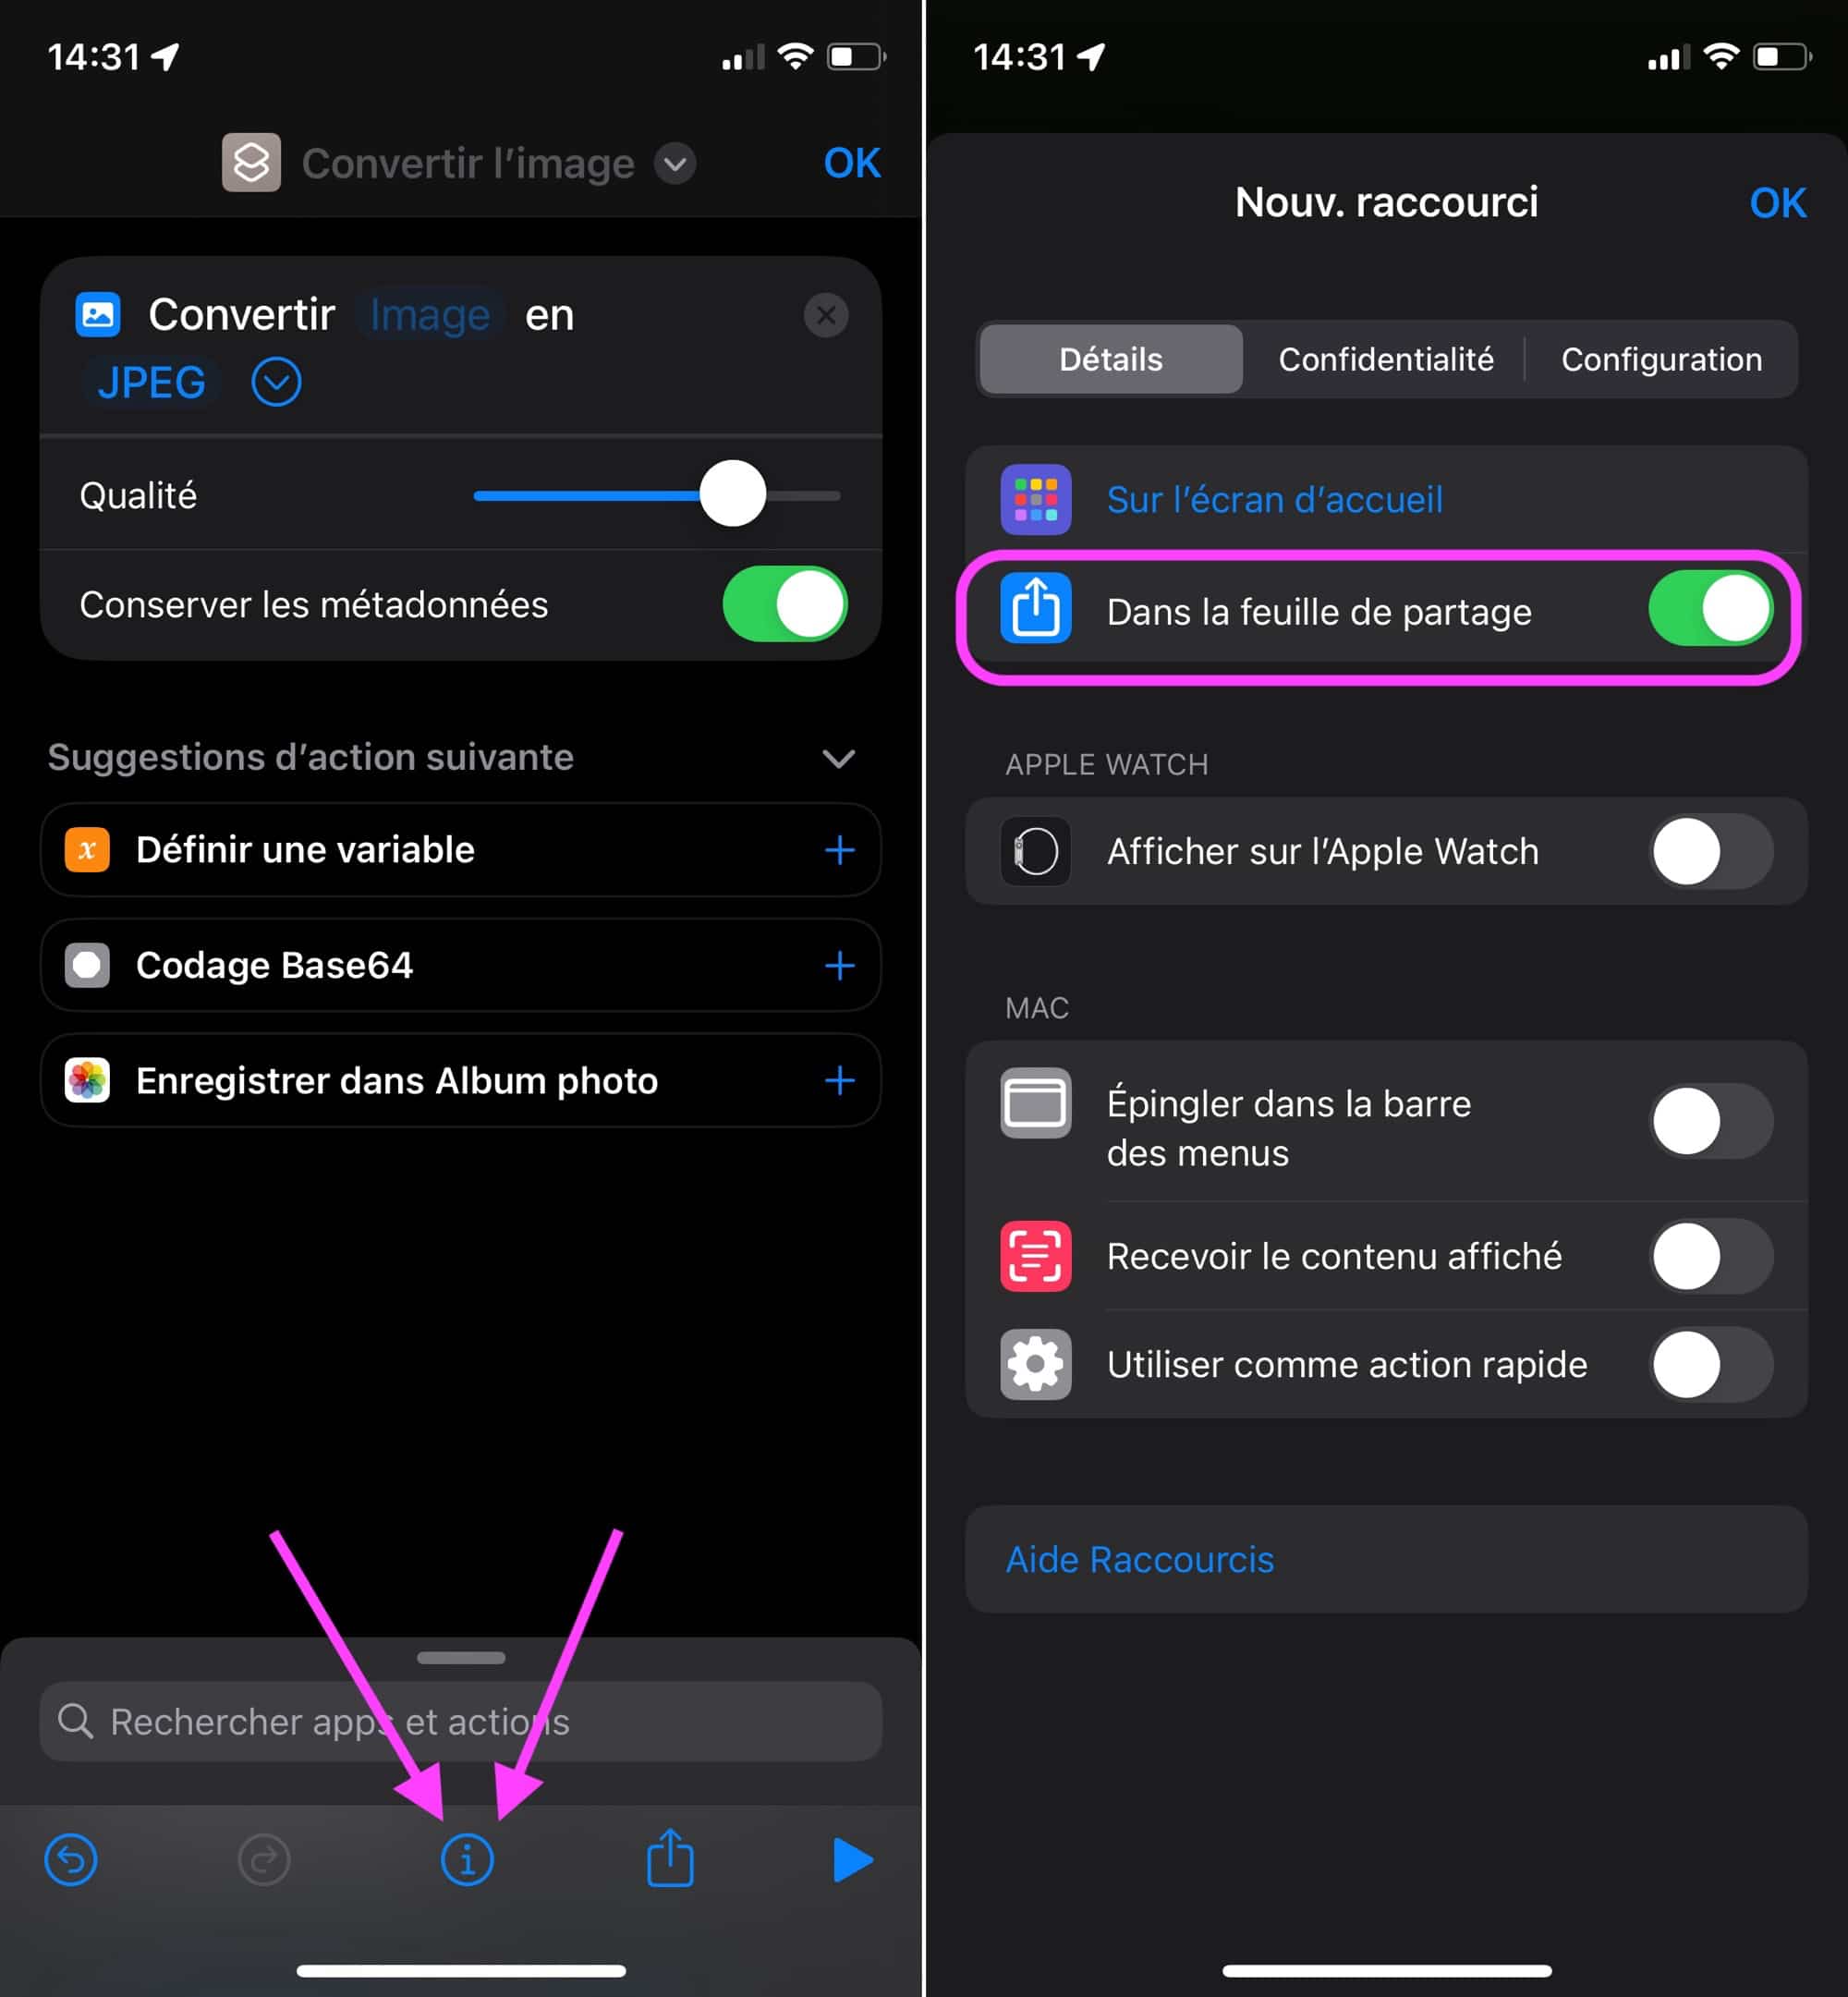
© Capture iOS par iPhon.fr
- Return to the main editing view to choose the image to convert by tapping “Image” and selecting “Shortcut Input”
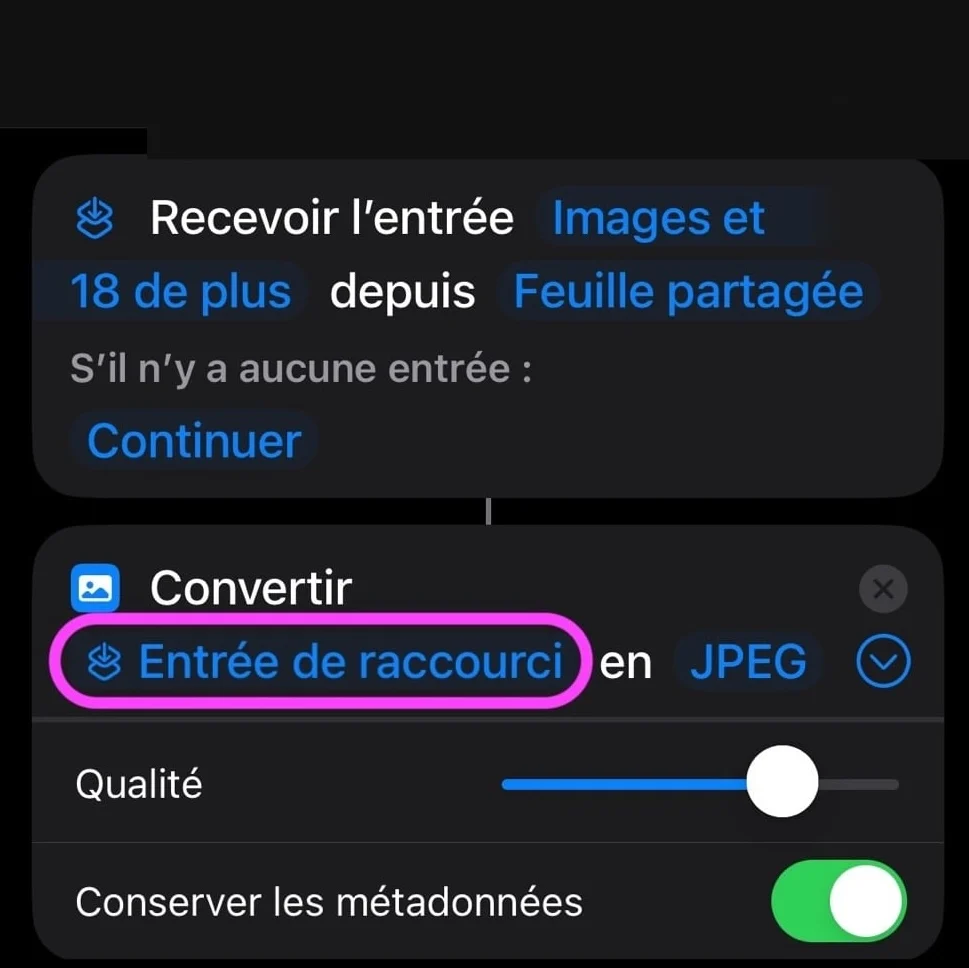
© Capture iOS par iPhon.fr
- It takes some action for the outgoing JPG file to be saved on the iPhone. To do this, add for example the action “Save in Photo album”
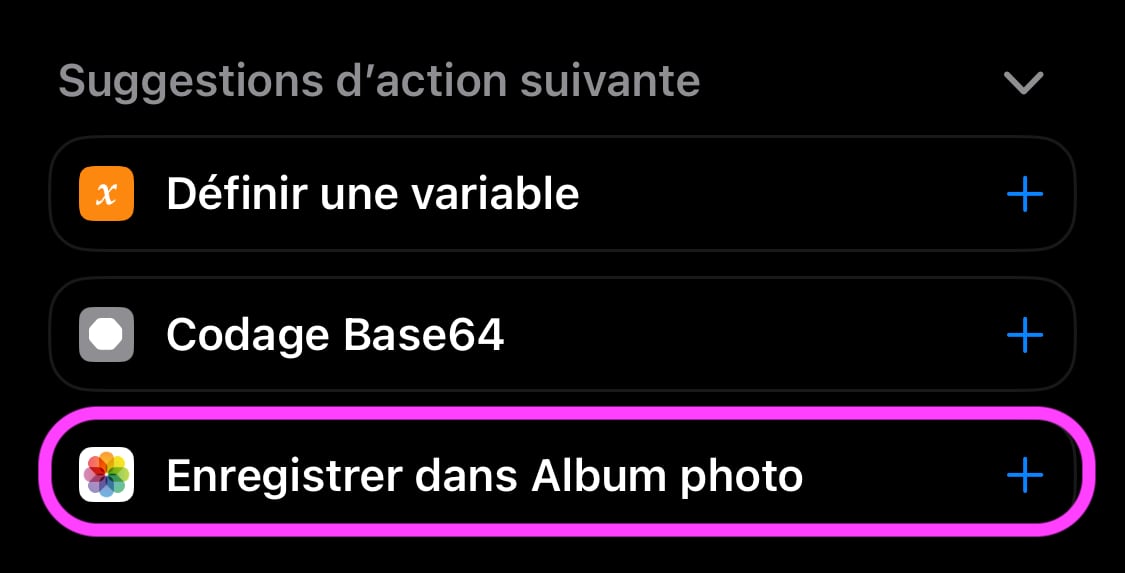
© Capture iOS par iPhon.fr
- Make sure “Converted Image” is indicated after “Save”. You can choose the destination album by tapping “Recent”
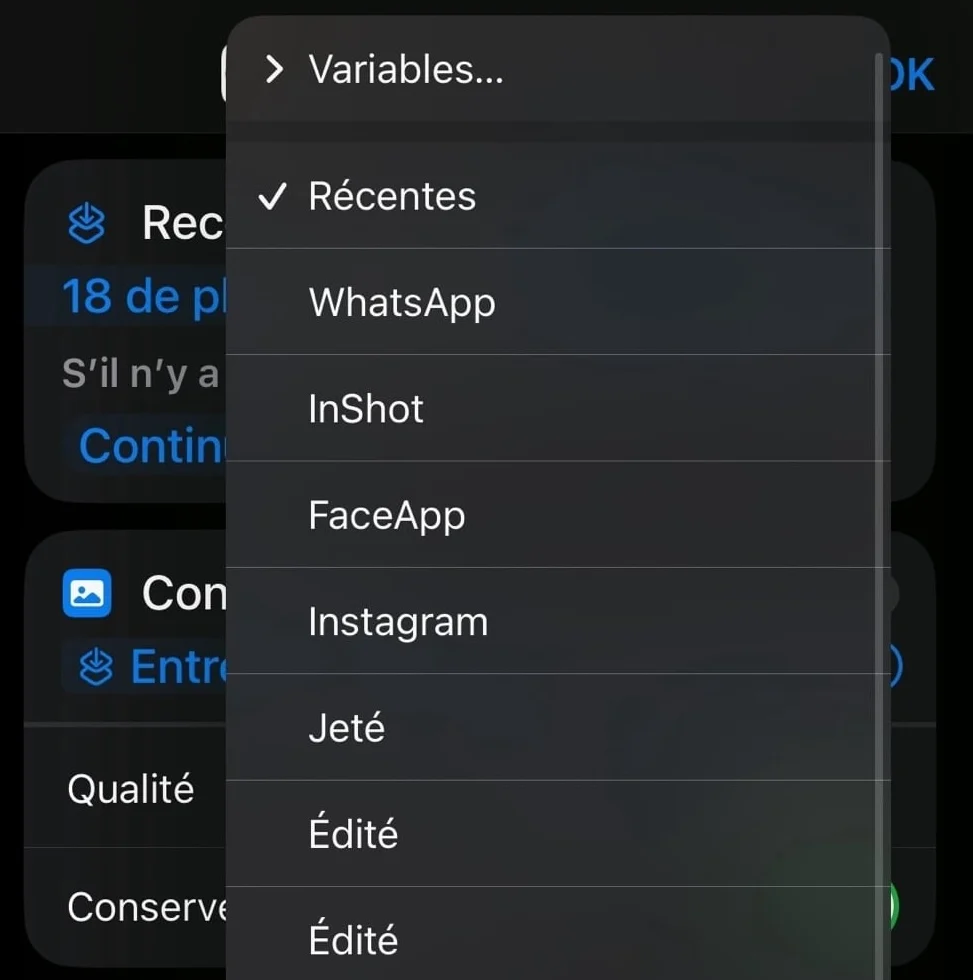
© Capture iOS par iPhon.fr
At this point, theshortcut is functional, it converts any image to JPG by saving the output file to your photo library.
But it doesn't delete the source image, which risks creating a whole bunch of duplicates for you. We then advise you to do the following:
- In your shortcut, add the action: “Delete photos”
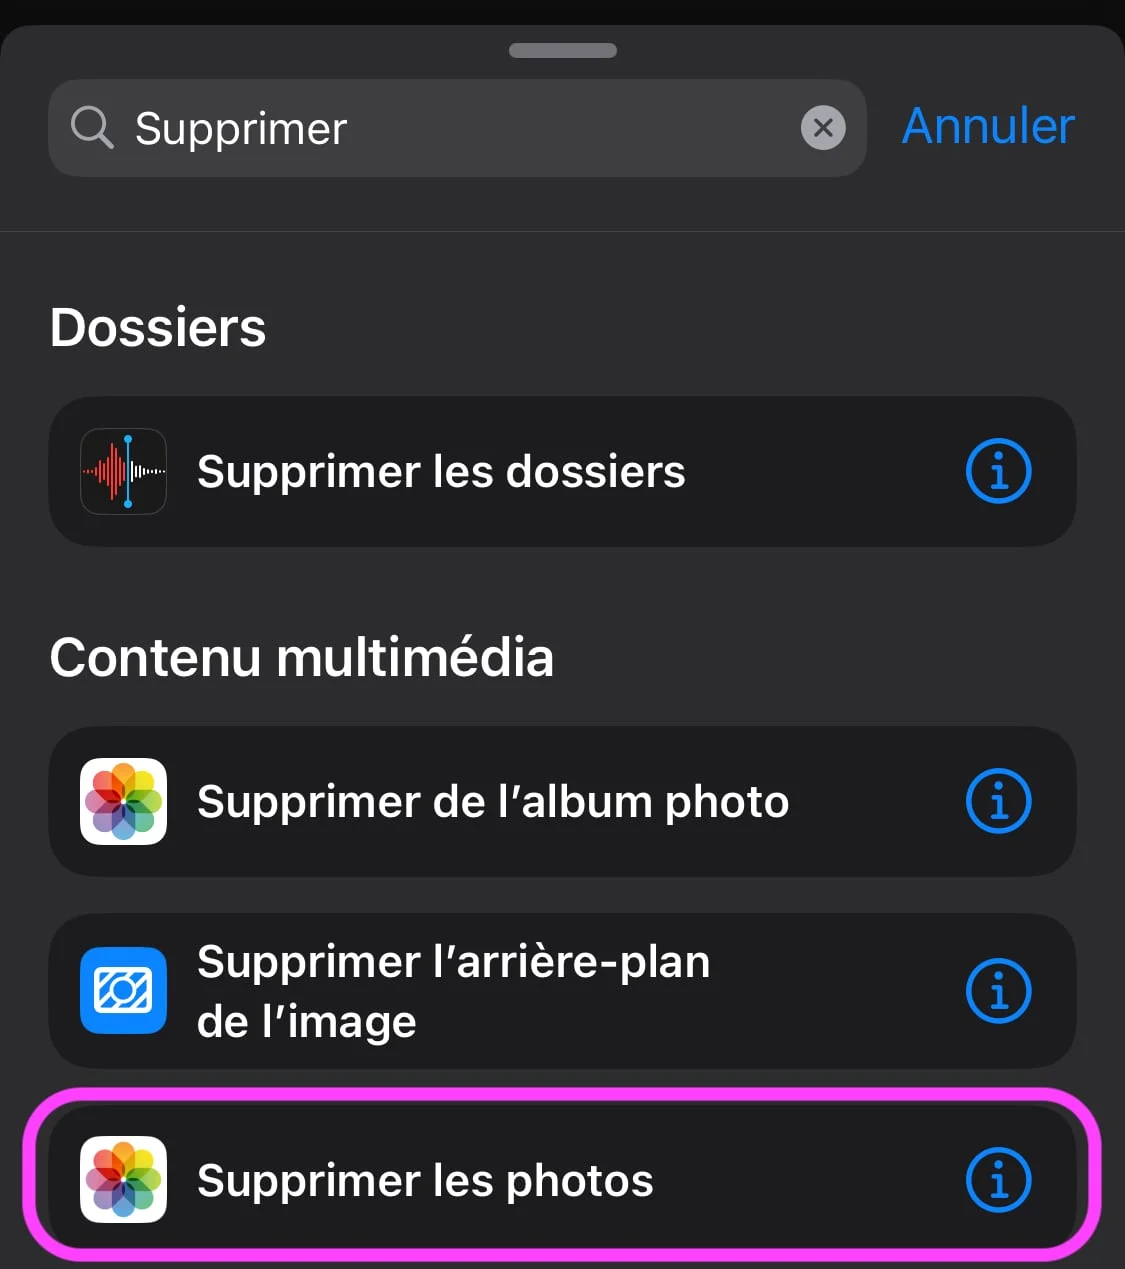
© Capture iOS par iPhon.fr
- Tap the blue text after “Delete” and choose “Clear Variable”
- Tap “Choose” and choose “Select Variable,” then tap “Shortcut Entry”

© Capture iOS par iPhon.fr
- Validate by pressing OK
So, each time your shortcut is launched, it will ask you for confirmation before deleting the source file(s). Because yes, the shortcut works on a selection of a single or several image(s). Practical !
Don't forget to personalize your shortcut by modifying its name and icon to improve clarity in the share sheet.
In summary, you can use different ways to save and convert your HEIC photos to JPG on iPhone:
- Force saving as JPG
- Convert to JPG when sharing
- Use a conversion website
- Use a third-party app
- Take advantage of a shortcut created in the Apple Shortcuts app
So, what is your favorite method for converting your images to JPG?

i-nfo.fr - Official iPhon.fr app
By : Keleops AG