 The iPhone is a fantastic camera, equipped with no less than two sensors, one on the front for selfies, the other on the back for more traditional shots. But why not combine these two objectives to offer additional possibilities?This is precisely the principle adopted by the “Panoclip”.
This accessory equipped with two 180 degree spherical lenses allows, with the appropriate app, tocreate 360 degree photos. While competing accessories use their own sensors, the “passive” solution adopted here, rather clever, allows the price to be reduced!
What do the photos taken with the Panoclip give, what are the possibilities offered?
Here is ourtestof an original and well thought-out accessory, as well as ouravison the limits encountered.
First contact with the Panoclip iPhone
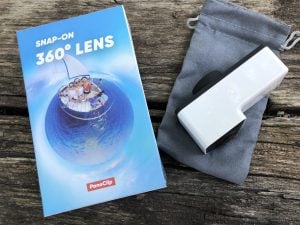
Once the Panoclip packaging is opened, we find the accessory itself, as well as a fabric pouch and instructions. We must not lose it, because it is important, we will come back to it later.
The Panoclip itself is made from a nice quality plastic, very cleanly molded.
But the most important thing is immediately apparent: these are the two lenses specially designed to offer a 180-degree view on each side.
The lens that is positioned on the front camera:
And the one positioned on the rear camera:
The fabric pouch is simple but functional and very practical, because you will of course have to be careful not to scratch the two lenses. This allows the accessory to be transported without risk.
Setting up and applying Panoclip
Usage is relatively simple. It first involves installing a specific application,Panoclip,free on the App Store here. This application requires activation, using a specific QR code, available in the instructions (when we said you shouldn't lose it!).
Once this installation and activation is complete, we are ready to insert the accessory on the iPhone. For this, a slot specifically adapted to the iPhone model is provided on the Panoclip, so you must be careful to choose the model adapted to the iPhone. There is a version that fits iPhone 7 and 8 and one for iPhone X.
It is on this precise adjustment and the correct alignment of the lenses with the front and rear lenses of the iPhone that the quality of the photos depends. We therefore understand that it is not possible to use this accessory with protection, itmust be inserted on a bare iPhone.
Once in place, simply switch to the application's shooting mode (it's called “Shoot”), press the button and presto, the shot is captured. It is not immediate but takes less than a second, during which you must of course not move! For this and as for any “serious” photography, we cannot recommend any stand highly enough. In the tests below, we used aselfie stick with integrated tripod and Bluetooth button from the Riversong brand on sale here(it is also the bottom of the tripod which can be seen in the photos below).
The application then takes care of creating the 360 degree view, byreconstructing from the two photos, rear and front. This can take a few tens of seconds but is done in the background, so it is possible to continue shooting during generation.
The result is a view that can be zoomed or changed in any direction with the touch of a finger. Try with the example below:
The possibilities offered by the Panoclip app
Once the photo is obtained, it is stored with the others in the application's photo album and in practice, this type of photo is very specific: its uses are multiple. This is where the application shows its full potential (knowing that it has been updated and enriched several times with new possibilities during our test phase of a few weeks).
Thus, we appreciate being able to apply aso-called HDR processingto the photos: each time this helped to give a good tone to the colors. This is almost essential because the addition of lenses mechanically reduces the quantity of light that hits the iPhone's photo cells. The result in HDR is immediately more pleasant: this should almost be an option activated by default (it is activated or removed shot by shot).
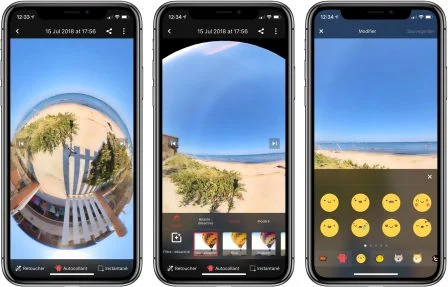
The application also allows you toexport photos in many formats: a static photo with a viewing angle of your choice, but alsovideoswith original effects including the rounded “little planet” which shows the entire scene on the screen by rounding it. These videos can then be stored in the film roll for sending to social networks or site of choice (direct sending options are offered, not tested).
The choices of possibilities in terms ofvideoare numerous: adapted toface to face selfies(on each side of the lens) or side by side, as well as additions ofimpressive special effects. The result is rather stunning!
An example (knowing that it is possible to export without effect, just with various points of view):
But it is also possible to export a “360 degree photo”: a specific format, stored in the camera roll in rectangular form, which then allows the image to be retrieved in compatible apps, such as the most famous: Google Street View.
Here is an example:
Finally, it is possible to export the photos via the Internet to allow your contacts to find the 360 degrees on their computer or mobile devices. They can then play with it as we do in the application, to view the landscape from all possible angles. This export is either public or private, a link and a QR code then allow it to be shared.
Here is the rendering:
An example for a virtual tour:
Finally, we note thatin the application as in this export mode: a view with thegyroscopeof the phone (the display follows the movement of the phone) is provided. Better yet, for those who have acasque VR type cardboard, images can also be viewed this way.
But that's not all, because the app also offerstoolsediting tool allowing you to addfiltersand elements to images (stickers), without forgetting aspecial selfie option to make faces more pleasing to the eye.
Concerning the application, the verdict is clear: itimpresses with the wealth of possibilities offered both in export and in processing and visualization.We don't realize it immediately, but it is an important part of the proposed solution, which would not be at all as practical without such a complete software.
We note that the app is almost entirely inFrench: only a few small typos and omissions are still visible, but no fatal problem.
The limits of 360 photos with the Panoclip
But what do we get with this optical plus application assembly? What is the quality of the result?
First of all, it is necessary to note limitations, the first obvious one is that this system, based on two photos taken simultaneously and then adjusted in software,does not allow video capture. This may seem obvious, but once you get tired of photos, you would have liked to move on to videos. This is reserved for devices incorporating both optics and sensors, aiOS compatible model called Insta360 is also soldby the company that created the Panoclip.
Then, the main limit to know is linked to the very principle of Panoclip. He usesthe sensor on the front of the iPhone, which does not have the same capture fineness as the one on the back. Cecican be seen in the photoswhen we approach a little closer to consult them:one half is richer and more precise than the other. It is therefore a matter of choosing the main part carefully when capturing, so that it is at the back of the iPhone, not at the front (except in the case of a selfie where it is not not possible).
Finally, the shooting is not instantaneous like a classic shot, it is therefore essential to remain firmly fixed during the few seconds of capture, otherwise you risk having shots that do not align correctly. This is then seen at the joint between the two half-spheres.
We also note that in certain circumstances, the fact of clipping on the Panoclip, masking the brightness sensor, caused that of the screen to drop significantly. As a result, it became almost illegible outdoors. This was not systematic, but to avoid this problem, temporarily deactivate the automatic brightness adjustment.
Nothing irremediable then, but that's what makes the difference between such a minimalist solution in terms of hardware and a real 360-degree photo/video camera, sold for several hundred euros.
Panoclip review
Here we have an accessory offered at a completely reasonable price, since it is lower than certain dedicated iPhone lenses. The proposed application is of very good quality, particularly complete in terms of reprocessing possibilities, photo and video export or even VR and sharing offers. With a little practice it becomes possible to take beautiful 360 degree photos, an original and not very common possibility, which can be used by Instagram fans to expand their feed, but also why not to offer virtual tours in the area of real estate or to remember the places visited. The possibilities are endless.
There remain limits to be aware of, in particular the need to be very stable when taking pictures, a support then proves practical, while the most notable point is linked to the front sensor of the iPhone, which does not does not have the same quality as the rear sensor: one part of the photo then turns out to be more finely defined than the other. For those who accept this type of constraint, we have here aastonishing and well thought-out solution which allows a first approach to 360 photography without breaking the bank!
Etnos tests
recent iPhone accessories, dont :
Testing Homekit Eve Weather and Eve Room sensors: temperature, humidity,
air pressure and quality within reach of your iPhone!
RAVPower 64 GB Lightning USB 3.0 drive review: when to store and
charging iPhone, iPad are one!- Test of the
iPhone X Pitaka MagCase case: ultra-thin, pleasant and
magnetic - Test of the
batterie externe Aukey 20 000 mAh
Dodocool folding Apple Watch charger review
Belkin RockStar Lightning + Audio 3.5mm Adapter Review: For
use a 3.5mm headset and charge your iPhone 7, 8 or X
EasyAcc case test for iPhone
less than 10 euros (promo code included, video)
iPhone and iPad Syncwire Unbreakcable sync/charging cable test (7.2 euros
with promo code included)- Test
of the TP-Link iPhone connected socket: introduction for the home
connected - Test of
the 2 HP 5 W Bluetooth speaker with smartphone and tablet support
Aukey - Test of the
Aukey 10,000 mAh battery, 2 sockets and LED lamp for less than 13 euros with code
promo
Snapnator test: the “Magsafe” for MacBook Pro with USB-C port, photos,
video and first impressions- Test
reader: The iPhone case with integrated “flash” from Lumee to illuminate
selfies and night photos - Test
photo tripod for iPhone and other smartphones from Aukey
Mophie Juice Pack Air iPhone case review: built-in battery and
QI wireless charging- Test of the
Turata transparent case for iPhone 7 (7 euros) - Test :
what are the Turata cases for iPhone 7 and 7 plus worth, sold for 7 euros
Test of Qi-compatible wireless iPhone charging, offered by the brand
Choetech
Car charger test with 4.8 A Syncwire Lightning cable: MFi and
lifetime warranty, 10% reduction
Test of the OKCS Lightning extension cable for iPhone/iPad: for what use
?
Belkin RockStar Audio Lightning Adapter Review: For Charging
iPhone 7 with headphones plugged in
Test of the “Nike+” type bracelet for the Apple Watch by Venter at 17
euros, with a bright surprise!- Test
AirPods: photos and reviews
Testing Echo Mini Batteries with Built-in Lightning Jack- You test
chargeur 4 ports USB SyncWire - You test
Aukey 4-port USB cigarette lighter charger - Test
Aukey woven lightning cable
Test of the ShoulderPod S1 photo holder for iPhone and other smartphones:
professional equipment!
Test of the Milanese mesh bracelet for Apple Watch Jetech, sold less than 17
euros
Testing the Jumpdrive M20i USB/lightning key for iPhone/iPad
Home automation: test of the Eve Energy socket to be controlled from the iPhone and iPad
(compatible HomeKit/Siri)- You test
connected “physiotherapy” for iPhone: Bluetens!
Anker PowerCore 20100 mAh battery review: a power monster
for iPhone, iPad
The Panoclip
is noted4stars out of 5par iPhon.fr

i-nfo.fr - Official iPhon.fr app
By : Keleops AG